Waterfall Model
2025, February 05
1. Introduction
The Waterfall Model is one of the earliest software development methodologies, designed to provide a structured and sequential approach to project execution. It is best suited for projects where requirements are clear, stable, and well-documented.
1.1 What is it?
The Waterfall Model follows a linear and step-by-step progression, where each phase must be completed before moving to the next. The key phases include:
- Requirement Analysis: Gathering and documenting user needs.
- System Design: Creating architecture and technical specifications.
- Implementation: Writing and integrating code.
- Testing: Ensuring the system works as expected.
- Deployment: Releasing the software to end users.
- Maintenance: Handling bug fixes and updates.
1.2 Why it exists?
Before the Waterfall Model, software development was unstructured, leading to miscommunication, scope creep, and failure to meet deadlines. The Waterfall Model introduced:
- Clear documentation: Reducing ambiguity in requirements.
- Structured process: Ensuring systematic development.
- Predictability: Making project timelines and costs easier to estimate.
This model is ideal for projects requiring stringent documentation and compliance, such as in government and healthcare industries.
1.3 When it is used?
The Waterfall Model is commonly used in scenarios where changes during development are costly or impractical:
- Medical Software Development: Compliance with regulations like FDA approvals requires extensive documentation.
- Military & Aerospace Projects: Safety-critical systems demand rigorous upfront planning.
- Banking Systems: Secure and predictable development is necessary to prevent financial risks.
- Embedded Systems: Hardware dependencies mean changes are expensive and difficult.
1.4 When should you use it?
The Waterfall Model is best suited for:
- Fixed Requirements: When project specifications are clear and unlikely to change.
- Regulatory Compliance: Industries that require extensive documentation (e.g., healthcare, defense).
- Large-scale Enterprise Systems: Where structured and predictable development is crucial.
- Low-Risk Projects: Where changes in scope are minimal, reducing the need for flexibility.
1.5 How does it compare to alternatives?
1.5.1 Strengths
- Well-structured: Each phase has clear deliverables, making project management easier.
- Detailed documentation: Useful for knowledge transfer and maintenance.
- Predictability: Budget and timeline are easier to estimate upfront.
- Easy to manage: Best suited for inexperienced teams working on well-defined projects.
1.5.2 Weaknesses
- Rigid & Inflexible: Difficult to accommodate changes once development starts.
- Late Testing: Bugs and design flaws are discovered late in the development cycle.
- Slow Iteration: No working software is available until the final stage.
- Customer Involvement: Limited feedback during development, leading to potential mismatches in expectations.
1.5.3 Comparison with Agile
| Aspect |
Waterfall Model |
Agile Model |
| Approach |
Linear & Sequential |
Iterative & Incremental |
| Flexibility |
Low |
High |
| Customer Involvement |
Minimal |
Continuous |
| Testing |
After development |
During development |
| Best Use Cases |
Well-defined, stable requirements |
Changing, evolving requirements |
2. Key Principles
The Waterfall Model is based on a structured, linear approach where each phase is dependent on the completion of the previous one. It enforces discipline and detailed documentation to ensure predictable outcomes.
2.1 How it works step-by-step
The Waterfall Model follows a strict sequence of phases. Here’s how it works:
- Step 1: Requirement Analysis
- All project requirements are gathered and documented.
- Stakeholders provide input, and a Software Requirements Specification (SRS) document is created.
- Step 2: System Design
- Architectural design and technical specifications are developed.
- Includes data structures, algorithms, database design, and system interface definitions.
- Step 3: Implementation
- Developers write code based on design specifications.
- Code is built and integrated module by module.
- Step 4: Testing
- All modules are tested individually (unit testing).
- Integration testing ensures that all components work together.
- System testing validates overall functionality against requirements.
- Step 5: Deployment
- The final product is deployed to production.
- Users start using the system.
- Step 6: Maintenance
- Bugs and security patches are fixed.
- System is updated as required over time.
2.2 Key Components and Terminology
- Software Requirement Specification (SRS): A document defining functional and non-functional requirements.
- Baseline: A fixed reference point in project development used for comparison.
- Verification & Validation (V&V): Ensuring the system meets requirements and expectations.
- Integration Testing: Testing combined modules for correct interaction.
- Regression Testing: Ensuring new changes do not break existing functionality.
- Change Control: Managing modifications in project scope.
2.3 Manually Track How Variables Change During Execution
Let's take an example where we develop a simple login module using the Waterfall approach and manually track variables:
# Step 1: Requirement Analysis (Defined Variables)
username = None
password = None
is_authenticated = False

# Step 2: System Design (Function Definitions)
def login_system(user_input, pass_input):
    global username, password, is_authenticated
    username = "admin"
    password = "secure123"

    if user_input == username and pass_input == password:
        is_authenticated = True
    else:
        is_authenticated = False

# Step 3: Implementation (Code Execution)
user_input = "admin"
pass_input = "secure123"
login_system(user_input, pass_input)

# Step 4: Testing (Checking Variable States)
print(f"Username: {username}")  # Expected: admin
print(f"Password: {password}")  # Expected: secure123
print(f"Authentication Status: {is_authenticated}")  # Expected: True
Tracking Variables:
- Before calling
login_system(): username=None, password=None, is_authenticated=False
- After calling
login_system(): username="admin", password="secure123", is_authenticated=True
- If incorrect credentials are entered,
is_authenticated remains False.
3. Workflow & Process
Applying the Waterfall Model in real projects requires a structured approach. Each phase must be completed before moving to the next, ensuring clear documentation, testing, and validation.
3.1 Exact Process to Follow When Applying the Model
To implement the Waterfall Model effectively, follow these steps:
- Step 1: Requirement Analysis
- Gather all functional and non-functional requirements.
- Document them in the Software Requirement Specification (SRS).
- Ensure all stakeholders approve the requirements before proceeding.
- Step 2: System Design
- Design system architecture, data flow, and technical specifications.
- Create UML diagrams, ER models, and API designs.
- Decide programming languages, databases, and tools.
- Step 3: Implementation
- Develop the system according to the design specifications.
- Code individual modules and perform unit testing.
- Integrate modules into a single system.
- Step 4: Testing
- Conduct system-wide testing to detect and fix bugs.
- Perform regression, integration, and user acceptance testing.
- Ensure the product meets the original requirements.
- Step 5: Deployment
- Deploy the final product to production.
- Train end-users if necessary.
- Monitor initial usage for unexpected issues.
- Step 6: Maintenance
- Fix bugs and release updates over time.
- Optimize performance and add minor enhancements.
- Handle security patches and compliance updates.
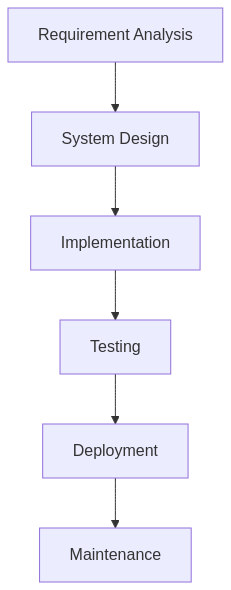
3.2 Flowchart Explaining the Workflow
The following flowchart represents the Waterfall Model process:
graph TD;
A[Requirement Analysis] --> B[System Design];
B --> C[Implementation];
C --> D[Testing];
D --> E[Deployment];
E --> F[Maintenance];
Each phase flows into the next, ensuring that all requirements are met sequentially.
3.3 Understand the Trade-offs
3.3.1 Advantages
- Structured Approach: Ensures clarity and discipline in development.
- Detailed Documentation: Useful for regulatory compliance and maintenance.
- Predictability: Well-defined scope, timeline, and budget.
- Easy to Manage: Best for large teams where roles and responsibilities are clearly defined.
3.3.2 Disadvantages
- Inflexible to Change: Once a phase is completed, returning to an earlier phase is costly.
- Late Testing: Bugs are discovered late in the process, making fixes expensive.
- Slow Feedback Loop: Users only see the final product at the end, increasing the risk of mismatched expectations.
- Not Ideal for Evolving Requirements: If requirements change frequently, Agile is a better approach.
3.3.3 When to Choose Waterfall Over Agile?
- When requirements are fixed and well-documented.
- When regulatory compliance requires strict documentation.
- When project risks are minimal, and changes are unlikely.
- When working on hardware-dependent projects where changes are expensive.
4. Tools & Technologies (Industry-Standard Implementation)
The Waterfall Model is widely used in industries requiring structured development processes. Several tools and technologies help manage requirements, documentation, development, testing, and deployment effectively.
4.1 List of Tools and Software Used in Real-World Implementations
Below are some industry-standard tools used to implement the Waterfall Model efficiently:
4.1.1 Requirement Gathering & Documentation
- Jira – Tracks and manages software requirements.
- IBM Engineering Requirements Management DOORS – Helps in formal requirements gathering.
- Microsoft Visio – Creates system design diagrams.
- Google Docs / Confluence – Collaborates on requirement documentation.
4.1.2 System Design
- Lucidchart – Creates architecture and flow diagrams.
- Enterprise Architect – Helps in UML modeling and system design.
- Draw.io – Free alternative for designing technical diagrams.
4.1.3 Implementation (Coding & Version Control)
- Visual Studio Code – A popular code editor for multiple programming languages.
- Eclipse / IntelliJ IDEA – Used for Java-based development.
- Git & GitHub – Version control for tracking code changes.
- Bitbucket – Alternative version control system.
4.1.4 Testing
- Selenium – Automated UI testing.
- JUnit – Unit testing framework for Java.
- TestNG – Advanced testing framework.
- Postman – API testing tool.
4.1.5 Deployment & Maintenance
- Jenkins – Automates build and deployment processes.
- Docker – Containerization for easy deployment.
- AWS CodeDeploy – Automates software deployments in cloud environments.
4.2 Installation/Setup Instructions for Jira (Requirement Tracking)
Jira is a widely used tool for tracking software development processes in the Waterfall Model.
Step 1: Sign Up for Jira
- Go to Jira Website.
- Click on Get it free and choose "Jira Software".
- Create an Atlassian account or sign in with an existing account.
- Choose the Free Plan for small teams.
Step 2: Create a Project
- Once logged in, click Create Project.
- Select Kanban or Scrum (even for Waterfall, Kanban helps in tracking stages).
- Name your project and configure access permissions.
Step 3: Set Up Issue Tracking
- Click on Backlog and create new issues for requirements.
- Add details such as priority, description, and assigned team members.
- Use labels like
Requirement Analysis, Design, Testing to categorize tasks.
Step 4: Manage Workflows
- Navigate to Project Settings > Workflows.
- Define custom workflows such as:
Requirement Gathering → Design → Implementation → Testing → Deployment → Maintenance
Step 5: Track Project Progress
- Use the Board View to visualize project phases.
- Generate reports for stakeholder updates.
- Integrate with Confluence for documentation.
Jira provides visibility into Waterfall development phases and helps in managing structured workflows efficiently.
5. Optimization & Best Practices (How to Do It Better?)
The Waterfall Model, though structured and predictable, has limitations that can lead to inefficiencies if not managed well. Optimizing its implementation ensures better outcomes, minimizes risks, and improves overall project efficiency.
5.1 Common Problems & How to Fix Them
Many teams face challenges while using the Waterfall Model. Here’s how to address them:
Problem 1: Late Discovery of Errors
- Issue: Since testing happens in later phases, defects are found late, making fixes expensive.
- Solution: Introduce early-stage reviews, code walkthroughs, and automated unit tests.
Problem 2: Requirement Changes Are Costly
- Issue: Once development starts, changes in requirements disrupt the project.
- Solution: Implement a rigorous change control process with stakeholder approval.
Problem 3: Customer Feedback Comes Too Late
- Issue: End-users only see the final product, leading to mismatches with expectations.
- Solution: Use prototyping tools and periodic stakeholder reviews.
Problem 4: Documentation Overhead
- Issue: Excessive documentation can slow down development.
- Solution: Maintain only necessary documentation and automate documentation updates where possible.
5.2 Best Practices Used by Top Companies
Leading companies use the following best practices to improve Waterfall development:
- Incremental Milestones: Instead of waiting for complete project delivery, release modules incrementally.
- Continuous Integration: Even in a Waterfall process, use CI/CD pipelines for early defect detection.
- Parallel Testing: Run system tests in parallel with development to catch issues earlier.
- Stakeholder Involvement: Hold periodic review meetings to ensure alignment with business needs.
- Risk Management: Maintain a risk register to track and mitigate project risks.
5.3 Ways to Optimize and Scale the Model
Scaling the Waterfall Model for large and complex projects requires optimization strategies:
1. Hybrid Approaches
- Integrate Agile elements like iterative releases within a Waterfall structure.
- Example: Use Waterfall for core system development and Agile for UI/UX improvements.
2. Automation
- Automate code testing (unit tests, integration tests) to reduce late-stage defects.
- Use DevOps tools like Jenkins for automated deployment.
3. Modularization
- Break down large projects into smaller modules with independent timelines.
- Ensure each module has clear entry and exit criteria.
4. Documentation Efficiency
- Use tools like Confluence and Jira to maintain structured yet lightweight documentation.
- Automate version control for requirement documents.
5. Risk-Driven Development
- Identify high-risk areas early (e.g., integrations, security).
- Allocate extra testing and validation time for critical components.
5.4 Checklist for Successful Implementation
Use this checklist to ensure your Waterfall project runs efficiently:
✅ Requirement Phase
- ✔ All requirements documented and approved in an SRS.
- ✔ Stakeholder agreement on project scope.
- ✔ Risk analysis completed.
✅ Design Phase
- ✔ Architecture diagrams and system flowcharts created.
- ✔ Technology stack finalized.
- ✔ Performance and scalability considerations documented.
✅ Implementation Phase
- ✔ Code versioning setup (Git, Bitbucket).
- ✔ Coding standards and best practices followed.
- ✔ Automated unit testing implemented.
✅ Testing Phase
- ✔ Test cases prepared and reviewed.
- ✔ Regression and integration testing performed.
- ✔ User acceptance testing (UAT) conducted.
✅ Deployment Phase
- ✔ Deployment plan documented and reviewed.
- ✔ Rollback strategy in place.
- ✔ Monitoring tools configured (e.g., AWS CloudWatch, Datadog).
✅ Maintenance Phase
- ✔ Bug tracking system set up (e.g., Jira, Redmine).
- ✔ Regular updates planned and documented.
- ✔ Security patches and compliance updates scheduled.
6. Real-World Case Study
Understanding the Waterfall Model through a real-world case study helps in recognizing its strengths and weaknesses in practical scenarios.
6.1 Example of a Company/Project Using This Model
Case Study: NASA’s Space Shuttle Software Development
NASA used the Waterfall Model for the development of the onboard software for the Space Shuttle. Given the mission-critical nature of the software, predictability, thorough documentation, and error-free execution were non-negotiable.
Why NASA Chose Waterfall:
- Requirements were highly stable and well-defined.
- Every module needed rigorous validation and verification.
- Changes in software late in development were extremely costly.
- Mission success depended on zero defects.
Process Followed:
- Gathered detailed specifications for every module.
- Designed a structured software architecture.
- Implemented and tested each module rigorously.
- Conducted exhaustive system-wide verification and validation.
- Deployed and monitored software performance on missions.
6.2 What Went Right & Wrong in Their Implementation
✅ What Went Right
- Zero-Defect Tolerance: The software had an error rate of only 0.1 bugs per 400,000 lines of code.
- Thorough Testing: Extensive testing prevented mission failures.
- Documentation Excellence: Every change was documented, helping future maintenance.
- Predictability: The sequential approach ensured every requirement was met before moving to the next phase.
❌ What Went Wrong
- High Costs: The rigorous documentation and validation process made development expensive.
- Slow Iteration: Fixing even minor changes required lengthy procedures.
- Late Feedback: Since testing was at the end, any mistakes in the early stages were expensive to correct.
6.3 Lessons Learned & Key Takeaways Students Can Apply
Students can apply the following lessons from NASA’s Waterfall implementation:
Lesson 1: Use Waterfall for High-Stakes Projects
- Best for projects where failure is unacceptable (e.g., aerospace, healthcare, financial systems).
- Helps maintain strict compliance with regulations.
Lesson 2: Document Everything, But Only What’s Necessary
- Detailed documentation ensures clarity but can slow down development.
- Balance documentation with efficiency.
Lesson 3: Consider Hybrid Approaches
- For projects requiring flexibility, combine Waterfall with Agile.
- Example: NASA now uses Agile in some areas like UI/UX but keeps Waterfall for mission-critical components.
Lesson 4: Validate Early & Frequently
- Early-stage validation can prevent costly errors later.
- Use peer reviews, simulations, and automated testing.
Lesson 5: Factor in Cost & Time
- Waterfall is predictable but expensive and slow.
- Consider project constraints before choosing this model.
7. Hands-On Project
The best way to understand the Waterfall Model is to apply it to a small project. In this section, we will guide you through a hands-on project where you will develop a Student Management System using the Waterfall approach.
7.1 Small Practical Project: Student Management System
Project Goal: Create a simple Student Management System that allows adding, viewing, and deleting student records.
Technologies: Python (or any preferred language), SQLite (for database), CLI-based UI.
7.2 Step-by-Step Instructions
Step 1: Requirement Analysis
- The system should allow adding, viewing, and deleting student records.
- Each student should have an
ID, Name, and Grade.
- Data should be stored persistently using SQLite.
Step 2: System Design
- Database: A
students table with id, name, and grade.
- Functions:
add_student(name, grade): Adds a student to the database.view_students(): Displays all student records.delete_student(id): Deletes a student by ID.
Step 3: Implementation (Coding)
import sqlite3

# Database setup
conn = sqlite3.connect("students.db")
cursor = conn.cursor()
cursor.execute('''CREATE TABLE IF NOT EXISTS students (
                    id INTEGER PRIMARY KEY AUTOINCREMENT,
                    name TEXT,
                    grade TEXT)''')
conn.commit()

# Function to add a student
def add_student(name, grade):
    cursor.execute("INSERT INTO students (name, grade) VALUES (?, ?)", (name, grade))
    conn.commit()
    print(f"Student {name} added successfully!")

# Function to view students
def view_students():
    cursor.execute("SELECT * FROM students")
    students = cursor.fetchall()
    for student in students:
        print(student)

# Function to delete a student
def delete_student(student_id):
    cursor.execute("DELETE FROM students WHERE id = ?", (student_id,))
    conn.commit()
    print(f"Student with ID {student_id} deleted.")

# Example Usage
add_student("Alice", "A")
add_student("Bob", "B")
view_students()
delete_student(1)
view_students()

conn.close()
Step 4: Testing
- Run the script and verify that:
- Adding students works.
- Students are displayed correctly.
- Deleting students removes them from the database.
Step 5: Deployment
- Package the script into an executable file (using PyInstaller).
- Distribute it to test users.
Step 6: Maintenance
- Fix any discovered bugs.
- Add new features (e.g., search, update student records).
7.3 Expected Output
Running the script should generate output like this:
Student Alice added successfully!
Student Bob added successfully!
(1, 'Alice', 'A')
(2, 'Bob', 'B')
Student with ID 1 deleted.
(2, 'Bob', 'B')
7.4 Additional Challenges
Once you complete the basic project, try these additional challenges:
- 🔹 Add an option to update student details.
- 🔹 Implement a simple UI using Tkinter.
- 🔹 Convert it into a web application using Flask/Django.
- 🔹 Add authentication to restrict access.
8. Common Mistakes & Debugging
While the Waterfall Model provides a structured approach, beginners often make mistakes that lead to project failures, delays, and increased costs. This section highlights the most common mistakes and provides a troubleshooting guide.
8.1 Top 5 Mistakes Beginners Make
❌ Mistake 1: Poor Requirement Gathering
- Problem: Incomplete or vague requirements lead to misaligned development efforts.
- Fix: Spend extra time during the Requirement Analysis phase, conduct stakeholder interviews, and validate requirements before proceeding.
❌ Mistake 2: Ignoring Testing Until the End
- Problem: Bugs discovered late in the process make fixes expensive and time-consuming.
- Fix: Introduce early-stage code reviews, static analysis, and incremental module testing.
❌ Mistake 3: Overloading with Documentation
- Problem: Excessive documentation slows down development without adding much value.
- Fix: Focus on essential documentation like SRS, system design diagrams, and test cases.
❌ Mistake 4: No Plan for Change Management
- Problem: If requirements change mid-project, Waterfall doesn’t handle it well.
- Fix: Implement a Change Control Process to track, approve, and manage changes efficiently.
❌ Mistake 5: Poor Communication Between Phases
- Problem: Information gaps between teams lead to misunderstandings and rework.
- Fix: Use tools like Jira, Confluence, or Slack for clear documentation and team collaboration.
8.2 Troubleshooting Guide for Fixing Errors
Here’s a quick guide to fixing common errors in a Waterfall-based project.
🚨 Issue 1: Requirements Keep Changing
- Cause: Poor initial requirement gathering.
- Solution: Lock requirements after approval, with a structured change request process.
🚨 Issue 2: Project Delays Due to Late Testing
- Cause: Testing phase scheduled too late in the cycle.
- Solution: Introduce unit and integration tests during the development phase.
🚨 Issue 3: Bug Fixes Break Other Features
- Cause: No regression testing before deployment.
- Solution: Implement automated testing frameworks like Selenium or JUnit.
🚨 Issue 4: Stakeholders Unhappy with Final Product
- Cause: No user feedback during development.
- Solution: Hold review meetings at each phase and use prototypes for validation.
🚨 Issue 5: Documentation Is Outdated
- Cause: No system to maintain evolving documentation.
- Solution: Use collaborative tools like Confluence and keep version-controlled documentation.
8.3 Alternative Approaches When Something Doesn’t Work
1️⃣ Use a Hybrid Approach
- Combine Waterfall’s structured approach with Agile’s flexibility.
- Example: Use Waterfall for core system development and Agile for UI improvements.
2️⃣ Introduce Iterative Feedback Loops
- Schedule frequent reviews with stakeholders.
- Use prototyping tools to visualize features before full implementation.
3️⃣ Automate Testing & Deployment
- Use CI/CD pipelines (Jenkins, GitHub Actions) to reduce testing and deployment overhead.
- Implement unit tests to catch issues early.
4️⃣ Implement Parallel Development
- Break the project into independent modules that different teams can develop simultaneously.
- This speeds up development while keeping a structured approach.