Abstract
This documentation provides a detailed technical guide to practical exercises in Database Management Systems (DBMS). It encompasses foundational and advanced topics including database creation, table manipulation, data insertion and retrieval, normalization, and complex SQL operations such as joins, aggregate functions, and transactions. Additionally, it covers the implementation of indexes, views, stored procedures, triggers, and security practices to ensure data integrity and efficiency. The guide aims to equip practitioners with the necessary skills for proficient database management, emphasizing best practices for maintaining robust and secure database environments.
1. Creating a Database
To begin working with a database, we need to create it first. A database is a structured collection of data that can be easily accessed, managed, and updated. In SQL, we use the CREATE DATABASE statement for this purpose.
CREATE DATABASE IF NOT EXISTS StudentDB;2. Creating a Table of Students
Once the database is created, the next step is to create a table within this database to store student information. We use the CREATE TABLE statement to achieve this. A table consists of columns, each defined with a specific data type.
USE StudentDB;

CREATE TABLE IF NOT EXISTS Students (
    StudentID INT PRIMARY KEY,
    FirstName VARCHAR(50),
    LastName VARCHAR(50),
    DateOfBirth DATE,
    Gender CHAR(1),
    Email VARCHAR(100),
    PhoneNumber VARCHAR(15),
    EnrollmentDate DATE,
    Major VARCHAR(100)
);
2.1 Table Columns Explanation
The table Students includes the following columns:
- StudentID: An integer that uniquely identifies each student (Primary Key).
- FirstName: The first name of the student, stored as a variable character string of up to 50 characters.
- LastName: The last name of the student, stored as a variable character string of up to 50 characters.
- DateOfBirth: The date of birth of the student, stored as a date.
- Gender: The gender of the student, stored as a single character ('M' for male, 'F' for female).
- Email: The email address of the student, stored as a variable character string of up to 100 characters.
- PhoneNumber: The phone number of the student, stored as a variable character string of up to 15 characters.
- EnrollmentDate: The date the student was enrolled, stored as a date.
- Major: The major field of study of the student, stored as a variable character string of up to 100 characters.
2.2 Additional Information
These columns cover basic personal information, contact details, and academic information of students. Each column is defined with appropriate data types to ensure data integrity and efficient storage.
3. Inserting Data into the Students Table
After creating the Students table, the next step is to insert data into it. We use the INSERT INTO statement for this purpose. This statement allows us to add rows of data to the table.
Let us insert some random test data in our example. We will only work on these test data elements for this documentation.
INSERT INTO Students (StudentID, FirstName, LastName, DateOfBirth, Gender, Email, PhoneNumber, EnrollmentDate, Major)
VALUES
(1, 'John', 'Doe', '2000-01-15', 'M', '[email protected]', '123-456-7890', '2022-08-21', 'Computer Science'),
(2, 'Jane', 'Smith', '1999-05-30', 'F', '[email protected]', '098-765-4321', '2022-08-21', 'Biotechnology'),
(3, 'Sam', 'Johnson', '2001-07-22', 'M', '[email protected]', '555-555-5555', '2022-08-21', 'Mathematics'),
(4, 'Emily', 'Davis', '2000-11-10', 'F', '[email protected]', '444-444-4444', '2022-08-21', 'Physics');
-- Add more data similarly

-- Display the table 'students'
SELECT * FROM students;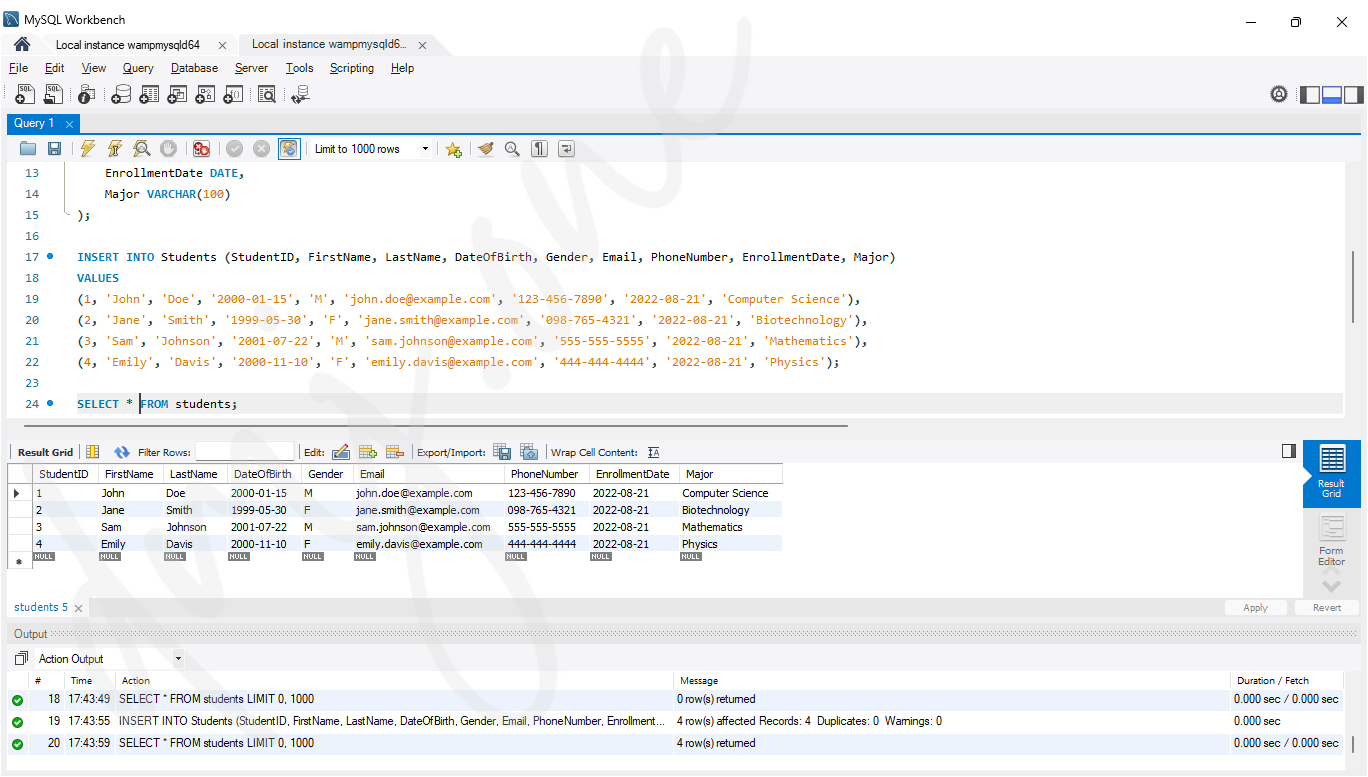
3.1 Data Explanation
The above INSERT INTO statement adds four rows of student data into the Students table. Each row corresponds to a different student with their respective details.
- StudentID: Unique identifier for each student.
- FirstName: The first name of the student.
- LastName: The last name of the student.
- DateOfBirth: The date of birth of the student.
- Gender: The gender of the student.
- Email: The email address of the student.
- PhoneNumber: The phone number of the student.
- EnrollmentDate: The date when the student enrolled.
- Major: The major field of study of the student.
3.2 Retrieving Data from the Students Table
Once data is inserted into the Students table, we can retrieve it using the SELECT statement. This statement allows us to query the table and fetch specific data based on our requirements.
SELECT * FROM Students;We ran this statement in the Figure 3.1 discussed above.
4. Updating Columns of the Students Table
Updating data in the table involves modifying existing values. The UPDATE statement is used for this purpose. This statement allows us to change values in one or more columns for rows that meet specific criteria.
-- Update the email address of a specific student
UPDATE Students
SET Email = '[email protected]'
WHERE StudentID = 1;

-- Update the major of all students enrolled in 2022 to 'Undeclared'
UPDATE Students
SET Major = 'Undeclared'
WHERE EnrollmentDate = '2022-08-21';
-- Then, verify using:
SELECT * FROM Students;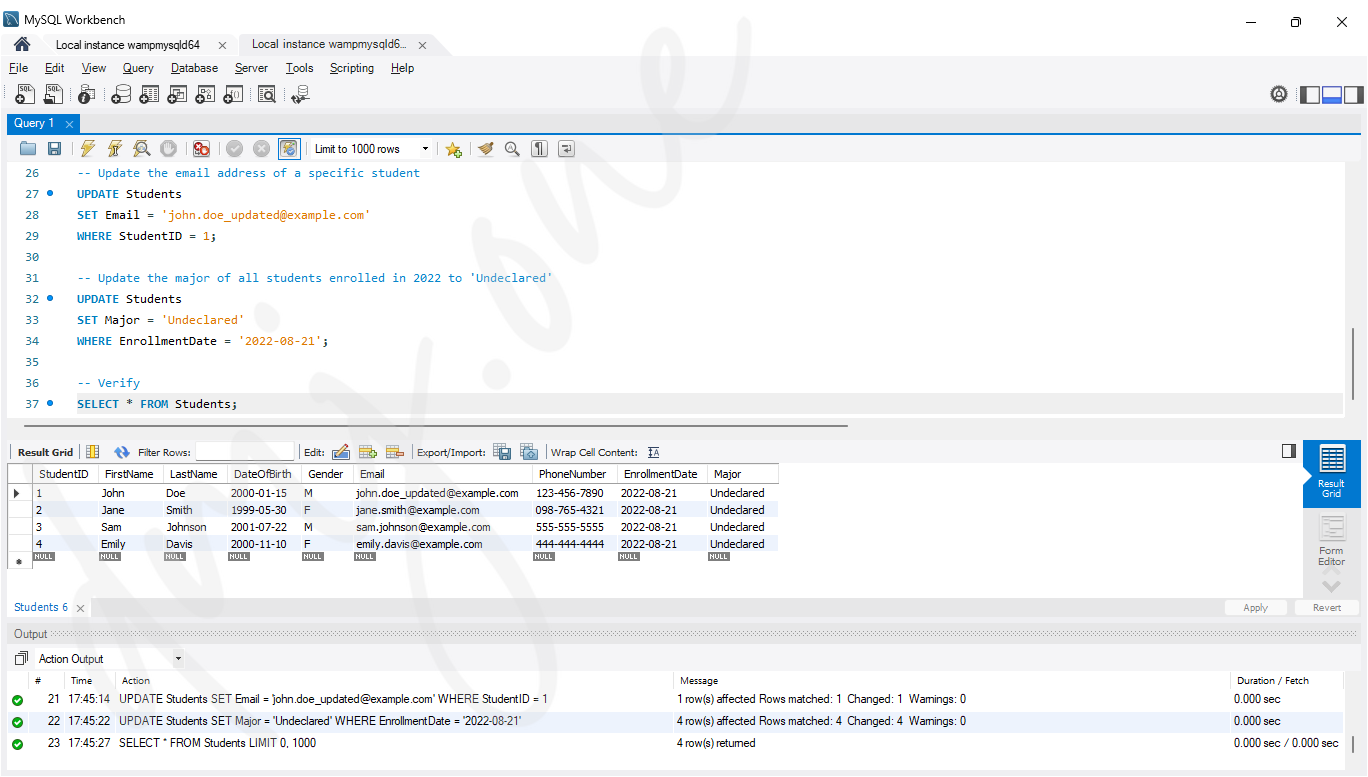
4.1 Update Explanation
The above UPDATE statements perform the following actions:
- The first statement updates the email address of the student with StudentID equal to 1.
- The second statement updates the Major of all students who enrolled on '2022-08-21' to 'Undeclared'.
4.2 Deleting Data from the Students Table
Deleting data from a table involves removing rows based on specified criteria. The DELETE statement is used for this purpose. This statement allows us to remove one or more rows from the table.
-- Delete a specific student by StudentID
DELETE FROM Students
WHERE StudentID = 1;

-- Delete all students enrolled in 2022
DELETE FROM Students
WHERE EnrollmentDate = '2022-08-21';
-- Then, verify using:
SELECT * FROM Students;
The DELETE statement can be used in various modes to remove data:
- Single Row Deletion: Removes a specific row based on a unique identifier like
StudentID. - Multiple Rows Deletion: Removes multiple rows that match a certain condition, such as all students enrolled on a particular date.
- Conditional Deletion: Deletes rows based on complex conditions involving multiple columns and logical operators.
-- Delete students based on multiple conditions
DELETE FROM Students
WHERE Major = 'Undeclared' AND EnrollmentDate < '2023-01-01';
5. Altering the Students Table
We may need to change the structure of an existing table by adding, removing, or modifying columns. The ALTER TABLE statement is used for these operations.
5.1 Adding a Column
To add a new column to the Students table, use the ADD COLUMN clause with the ALTER TABLE statement.
-- Add a new column for the student's address
ALTER TABLE Students
ADD COLUMN Address VARCHAR(255);
-- Then, verify using:
EXPLAIN students;
5.2 Removing a Column
To remove an existing column from the Students table, use the DROP COLUMN clause with the ALTER TABLE statement.
-- Remove the Gender column from the Students table
ALTER TABLE Students
DROP COLUMN Gender;
-- Then, verify using:
EXPLAIN students;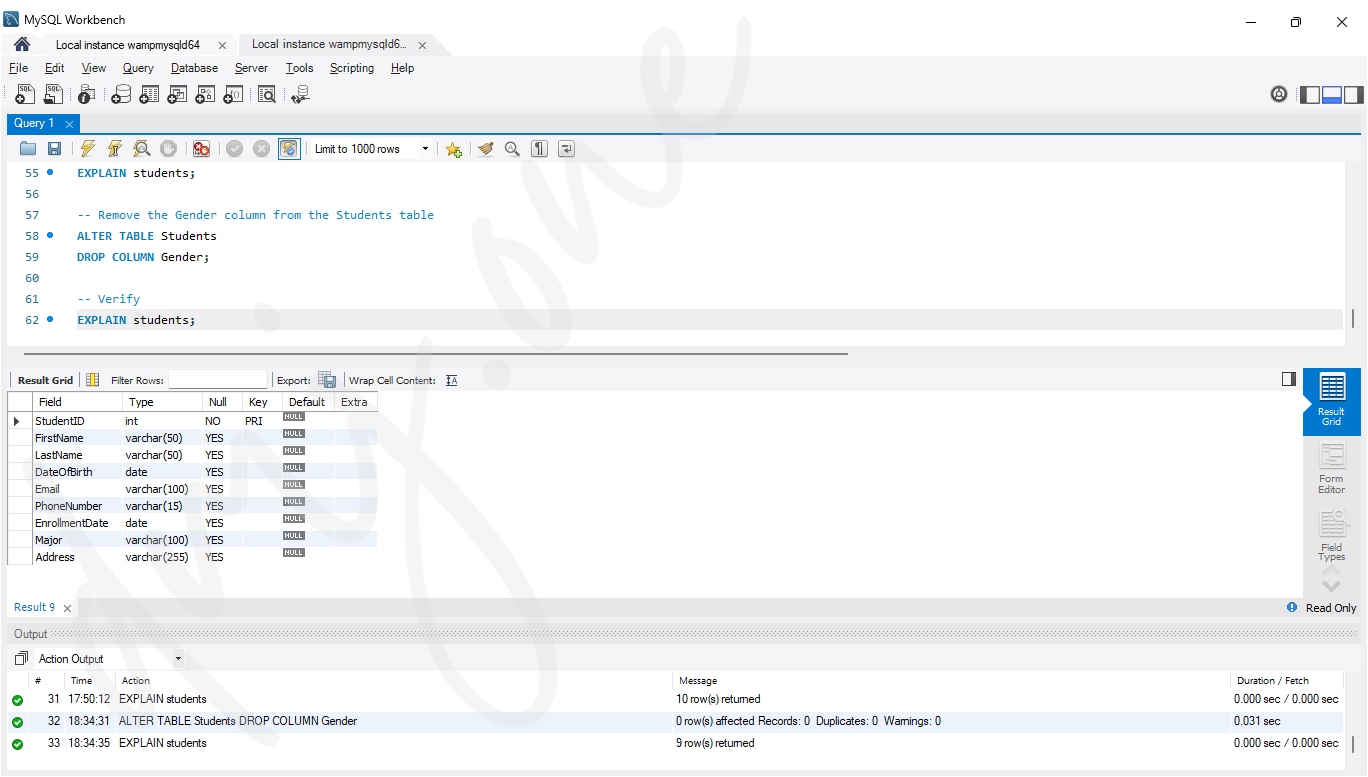
5.3 Modifying a Column
To change the data type or other attributes of an existing column, use the MODIFY COLUMN clause with the ALTER TABLE statement.
-- Modify the PhoneNumber column to increase its length
ALTER TABLE Students
MODIFY COLUMN PhoneNumber VARCHAR(20);
-- Then, verify using:
EXPLAIN students;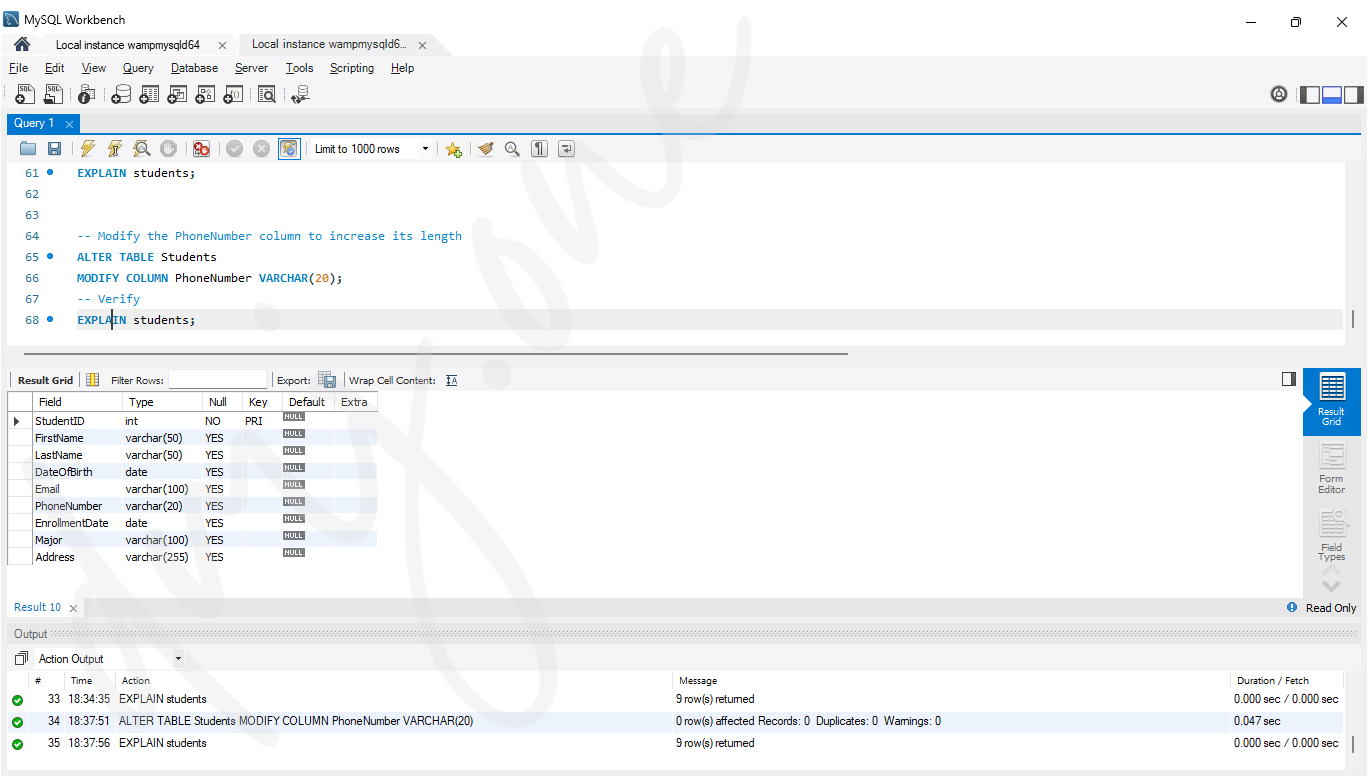
5.4 Alter Table Explanation
The above ALTER TABLE statements perform the following actions:
- The first statement adds a new column Address to store the address of students.
- The second statement removes the Gender column from the table.
- The third statement modifies the PhoneNumber column to increase its length to 20 characters.
6. Normalizing the Database
Normalization is the process of organizing data to reduce redundancy and improve data integrity. It involves decomposing a table into smaller tables and defining relationships between them. Here, we will break the Students table into multiple tables to achieve a higher normal form.
6.1 Creating Normalized Tables
We will create separate tables for personal information, contact details, and academic details.
-- Create table for personal information
CREATE TABLE StudentPersonal (
    StudentID INT PRIMARY KEY,
    FirstName VARCHAR(50),
    LastName VARCHAR(50),
    DateOfBirth DATE
);

-- Create table for contact details
CREATE TABLE StudentContact (
    StudentID INT PRIMARY KEY,
    Email VARCHAR(100),
    PhoneNumber VARCHAR(20),
    Address VARCHAR(255)
);

-- Create table for academic details
CREATE TABLE StudentAcademic (
    StudentID INT PRIMARY KEY,
    EnrollmentDate DATE,
    Major VARCHAR(100)
);
6.2 Inserting Data into Normalized Tables
We will insert data into these normalized tables. Here’s how we distribute the existing data:
-- Insert data into StudentPersonal table
INSERT INTO StudentPersonal (StudentID, FirstName, LastName, DateOfBirth)
VALUES
(1, 'John', 'Doe', '2000-01-15'),
(2, 'Jane', 'Smith', '1999-05-30'),
(3, 'Sam', 'Johnson', '2001-07-22'),
(4, 'Emily', 'Davis', '2000-11-10');

-- Insert data into StudentContact table
INSERT INTO StudentContact (StudentID, Email, PhoneNumber, Address)
VALUES
(1, '[email protected]', '123-456-7890', '123 Main St'),
(2, '[email protected]', '098-765-4321', '456 Elm St'),
(3, '[email protected]', '555-555-5555', '789 Oak St'),
(4, '[email protected]', '444-444-4444', '101 Pine St');

-- Insert data into StudentAcademic table
INSERT INTO StudentAcademic (StudentID, EnrollmentDate, Major)
VALUES
(1, '2022-08-21', 'Undeclared'),
(2, '2022-08-21', 'Undeclared'),
(3, '2022-08-21', 'Mathematics'),
(4, '2022-08-21', 'Physics');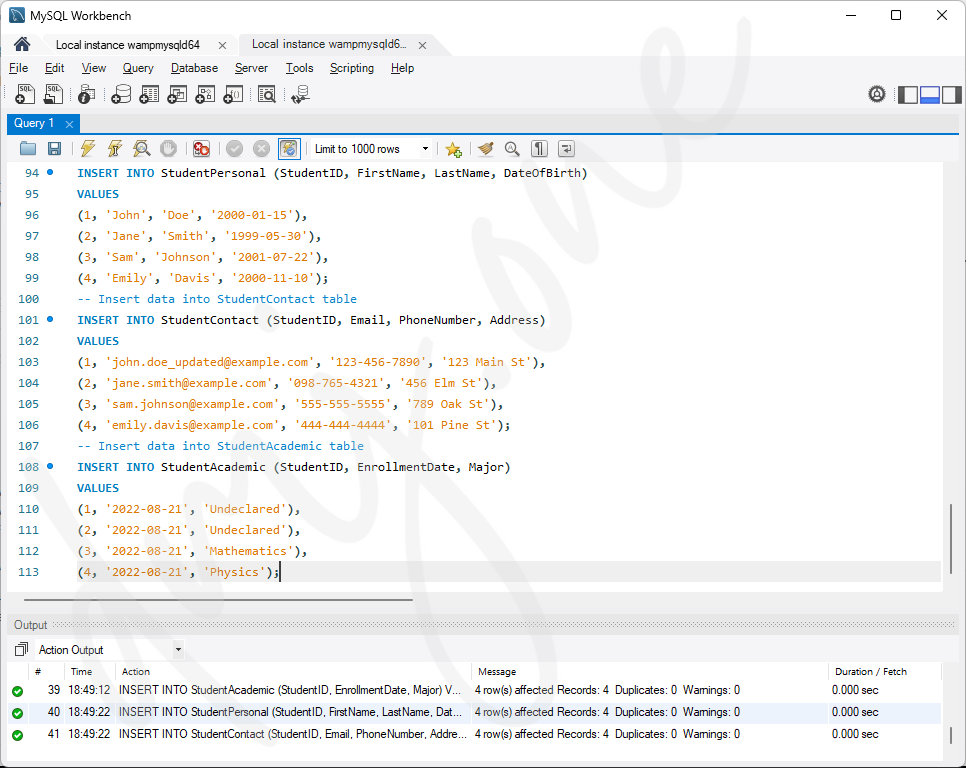
6.3 Defining Foreign Keys
To maintain relationships between these tables, we need to define foreign keys. Each table references the StudentID from the StudentPersonal table.
-- Add foreign key constraints
ALTER TABLE StudentContact
ADD CONSTRAINT FK_StudentContact_StudentPersonal
FOREIGN KEY (StudentID) REFERENCES StudentPersonal(StudentID);

ALTER TABLE StudentAcademic
ADD CONSTRAINT FK_StudentAcademic_StudentPersonal
FOREIGN KEY (StudentID) REFERENCES StudentPersonal(StudentID);
6.4 Normalization Explanation
The normalization process achieved the following:
- Separated personal, contact, and academic information into distinct tables.
- Reduced redundancy by ensuring each piece of information is stored only once.
- Maintained relationships using foreign keys to ensure data integrity.
7. Performing Joins on Normalized Tables
Joins are used to combine rows from two or more tables based on related columns. Here, we will perform different types of joins to retrieve data from our normalized tables.
7.1 Inner Join
An INNER JOIN returns rows when there is a match in both tables.
-- Retrieve all student information using INNER JOIN
SELECT sp.StudentID, sp.FirstName, sp.LastName, sp.DateOfBirth, sc.Email, sc.PhoneNumber, sa.EnrollmentDate, sa.Major
FROM StudentPersonal sp
INNER JOIN StudentContact sc ON sp.StudentID = sc.StudentID
INNER JOIN StudentAcademic sa ON sp.StudentID = sa.StudentID;
7.2 Left Join
A LEFT JOIN returns all rows from the left table, and the matched rows from the right table. If no match is found, NULL values are returned for columns from the right table.
-- Retrieve all personal information with contact details (if available) using LEFT JOIN
SELECT sp.StudentID, sp.FirstName, sp.LastName, sp.DateOfBirth, sc.Email, sc.PhoneNumber
FROM StudentPersonal sp
LEFT JOIN StudentContact sc ON sp.StudentID = sc.StudentID;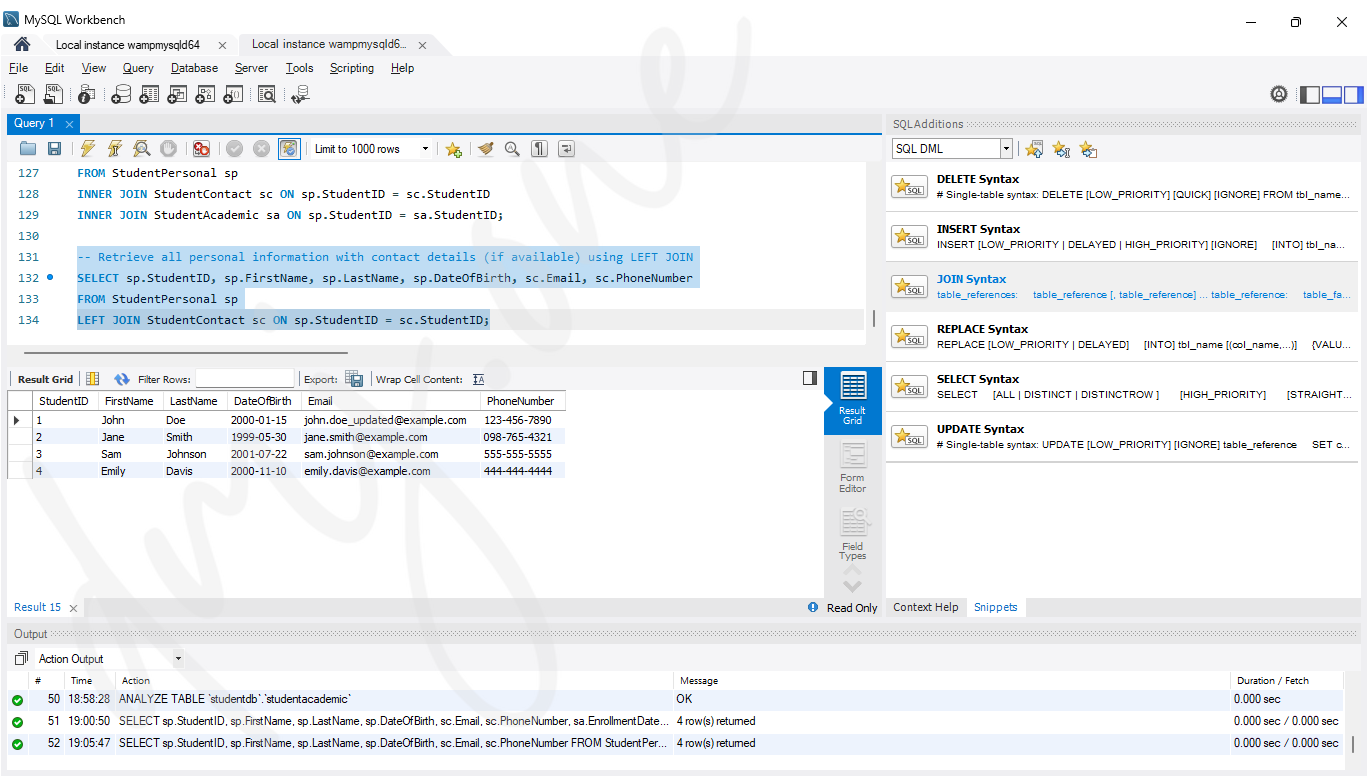
7.3 Right Join
A RIGHT JOIN returns all rows from the right table, and the matched rows from the left table. If no match is found, NULL values are returned for columns from the left table.
-- Retrieve all academic details with personal information (if available) using RIGHT JOIN
SELECT sa.StudentID, sa.EnrollmentDate, sa.Major, sp.FirstName, sp.LastName
FROM StudentAcademic sa
RIGHT JOIN StudentPersonal sp ON sa.StudentID = sp.StudentID;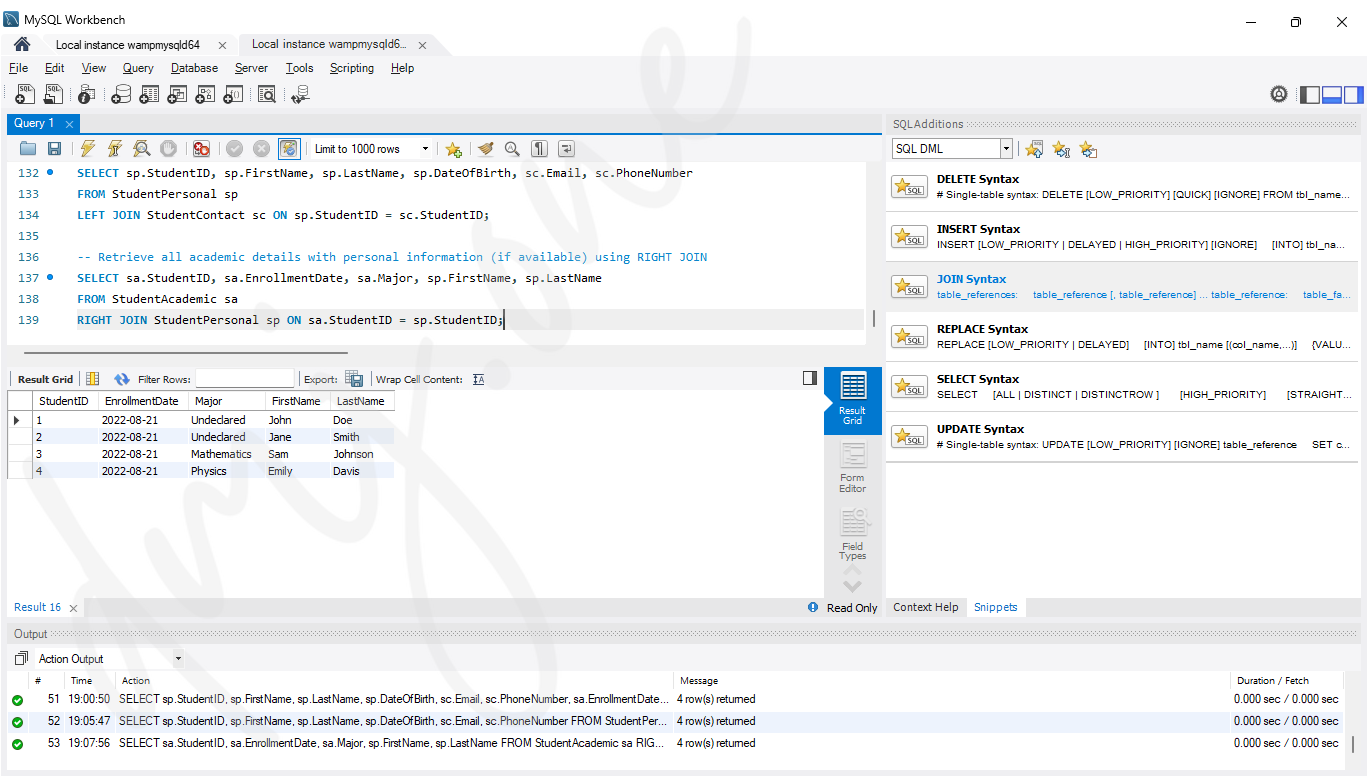
7.4 Full Outer Join
A FULL OUTER JOIN returns all rows when there is a match in either left or right table. Rows without a match will contain NULL values.
-- Retrieve all student information using FULL OUTER JOIN
SELECT sp.StudentID, sp.FirstName, sp.LastName, sc.Email, sc.PhoneNumber, sa.EnrollmentDate, sa.Major
FROM StudentPersonal sp
FULL OUTER JOIN StudentContact sc ON sp.StudentID = sc.StudentID
FULL OUTER JOIN StudentAcademic sa ON sp.StudentID = sa.StudentID;
But since MySQL does not support FULL OUTER JOIN, so we will use UNION
-- Retrieve all student information using UNION
    -- This query performs the following steps:
-- The first part of the UNION handles the LEFT JOIN from StudentPersonal to StudentContact and StudentAcademic.
-- The second part handles the LEFT JOIN from StudentContact to StudentPersonal and StudentAcademic.
-- The third part handles the LEFT JOIN from StudentAcademic to StudentPersonal and StudentContact.

SELECT sp.StudentID, sp.FirstName, sp.LastName, sc.Email, sc.PhoneNumber, sa.EnrollmentDate, sa.Major
FROM StudentPersonal sp
LEFT JOIN StudentContact sc ON sp.StudentID = sc.StudentID
LEFT JOIN StudentAcademic sa ON sp.StudentID = sa.StudentID

UNION

SELECT sp.StudentID, sp.FirstName, sp.LastName, sc.Email, sc.PhoneNumber, sa.EnrollmentDate, sa.Major
FROM StudentContact sc
LEFT JOIN StudentPersonal sp ON sp.StudentID = sc.StudentID
LEFT JOIN StudentAcademic sa ON sp.StudentID = sa.StudentID

UNION

SELECT sp.StudentID, sp.FirstName, sp.LastName, sc.Email, sc.PhoneNumber, sa.EnrollmentDate, sa.Major
FROM StudentAcademic sa
LEFT JOIN StudentPersonal sp ON sp.StudentID = sa.StudentID
LEFT JOIN StudentContact sc ON sp.StudentID = sc.StudentID;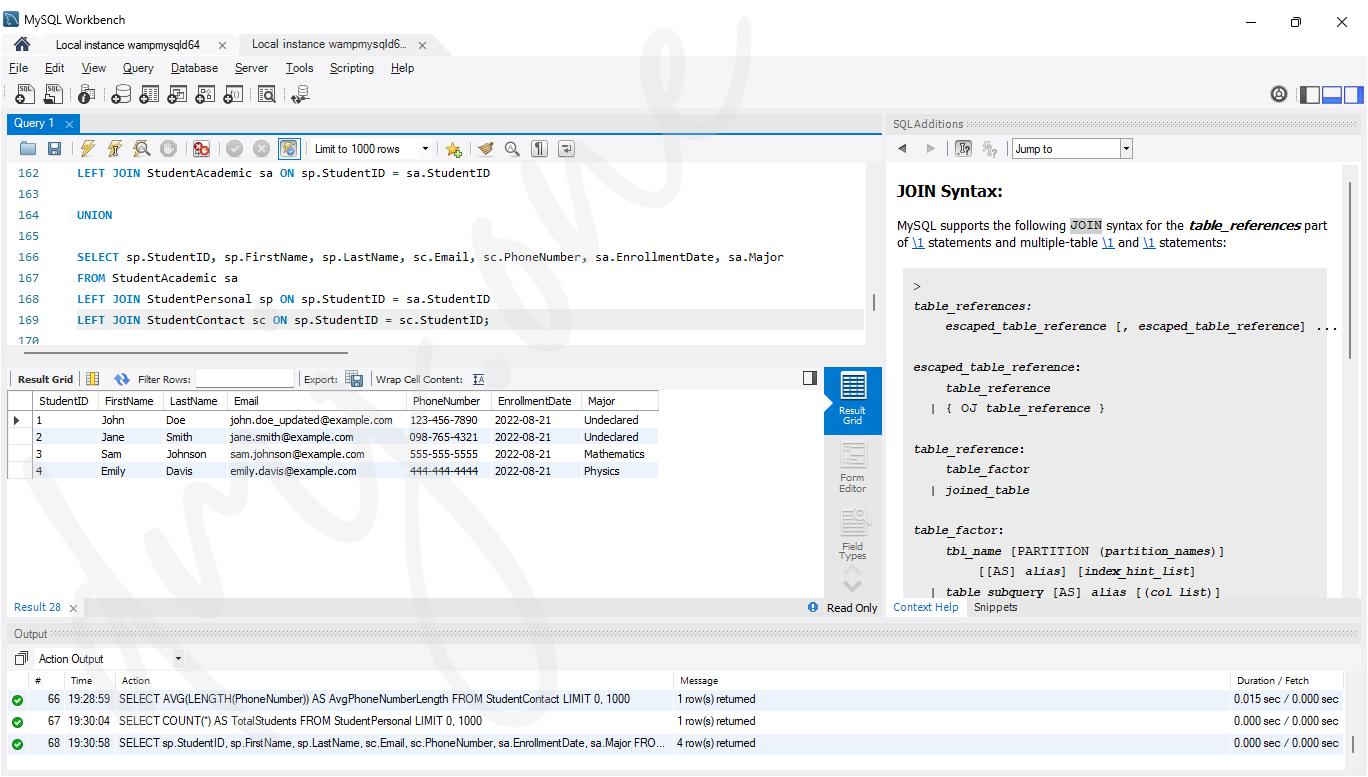
7.5 Join Explanation
The above JOIN operations perform the following:
- INNER JOIN: Combines rows from
StudentPersonal,StudentContact, andStudentAcademicwhereStudentIDmatches in all tables. - LEFT JOIN: Combines rows from
StudentPersonalwithStudentContact, including all rows fromStudentPersonaland matched rows fromStudentContact. - RIGHT JOIN: Combines rows from
StudentAcademicwithStudentPersonal, including all rows fromStudentAcademicand matched rows fromStudentPersonal. - FULL OUTER JOIN: Combines rows from all three tables, including unmatched rows with NULL values where matches are not found.
8. Performing Aggregate Functions
Aggregate functions perform calculations on a set of values and return a single value. Common aggregate functions include COUNT, MAX, MIN, SUM, and AVG. We will demonstrate these functions on the normalized tables.
8.1 COUNT Function
The COUNT function returns the number of rows that match a specified criterion.
-- Count the total number of students
SELECT COUNT(*) AS TotalStudents
FROM StudentPersonal;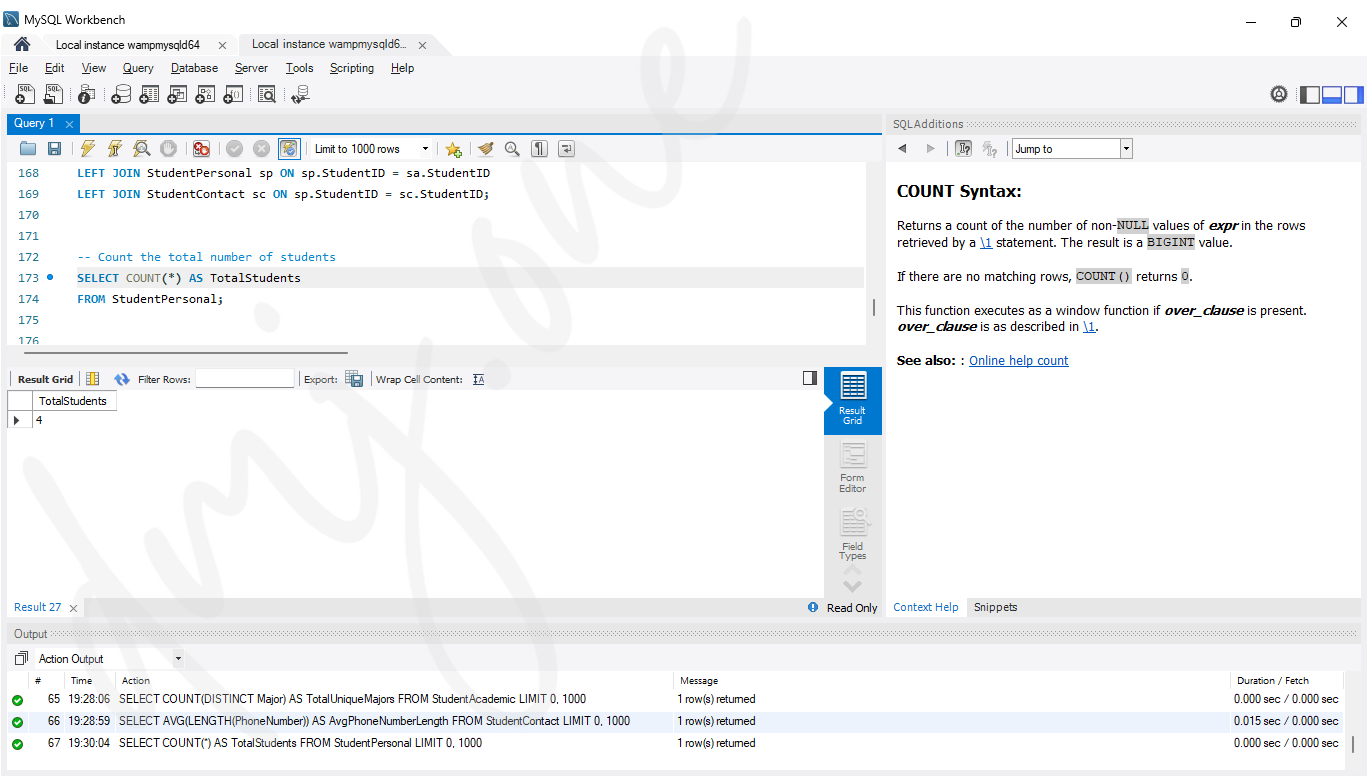
8.2 MAX Function
The MAX function returns the maximum value in a set.
-- Find the latest enrollment date
SELECT MAX(EnrollmentDate) AS LatestEnrollmentDate
FROM StudentAcademic;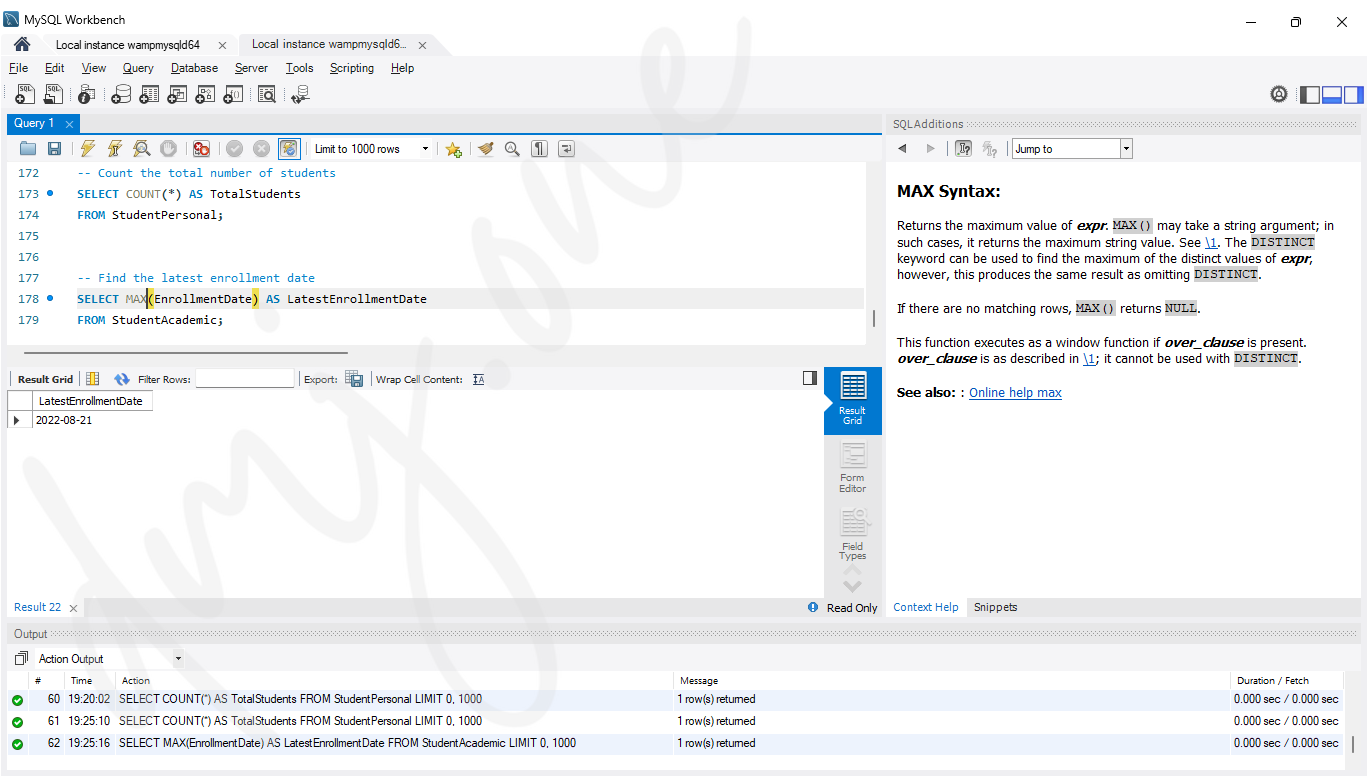
8.3 MIN Function
The MIN function returns the minimum value in a set.
-- Find the earliest date of birth
SELECT MIN(DateOfBirth) AS EarliestDateOfBirth
FROM StudentPersonal;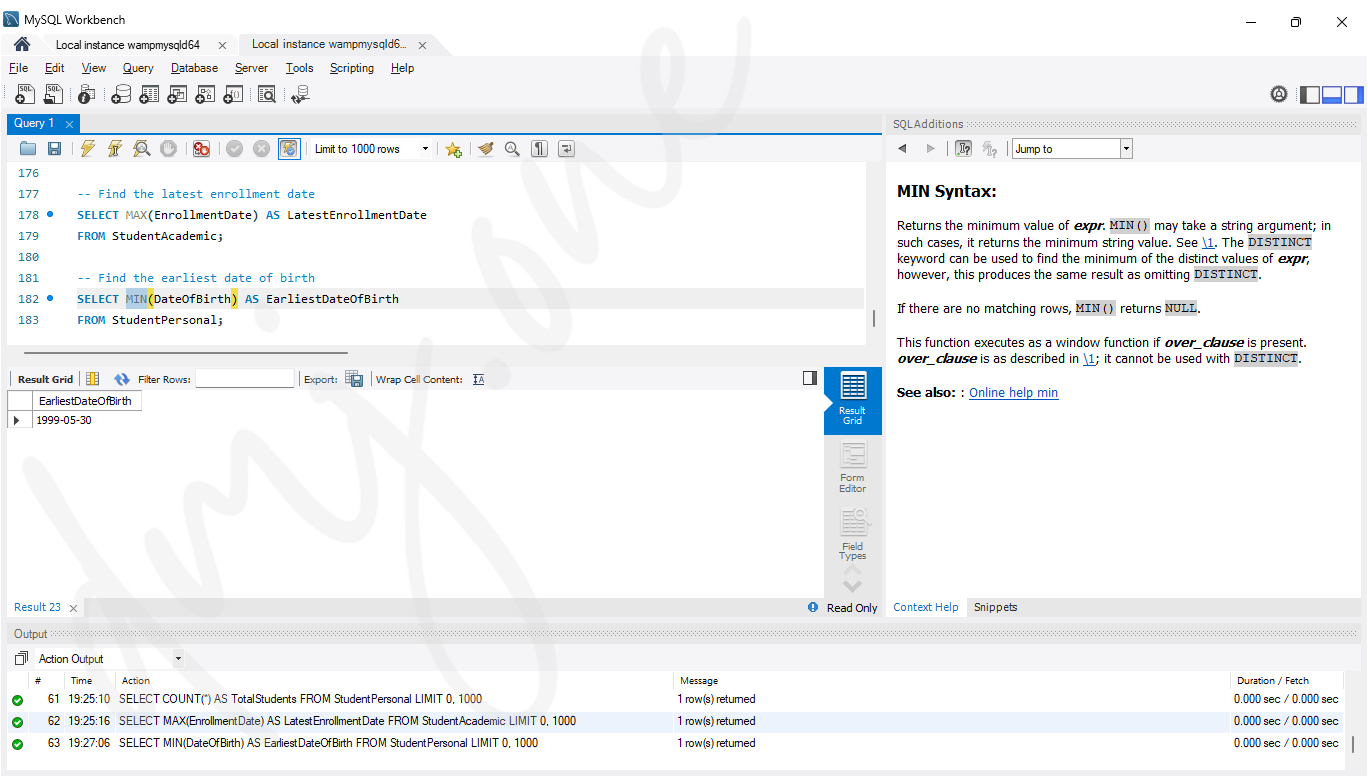
8.4 SUM Function
The SUM function returns the total sum of a numeric column.
-- Calculate the total number of unique majors
SELECT COUNT(DISTINCT Major) AS TotalUniqueMajors
FROM StudentAcademic;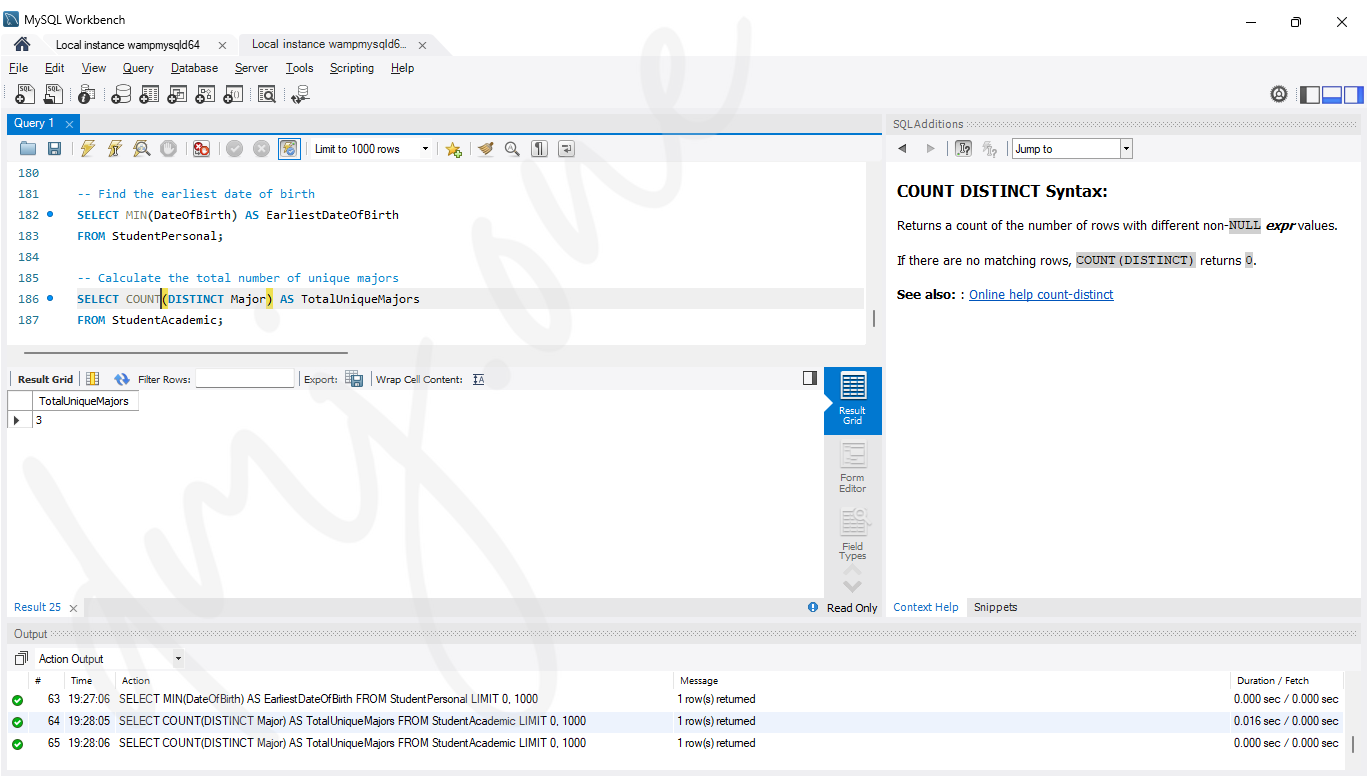
8.5 AVG Function
The AVG function returns the average value of a numeric column.
-- Calculate the average length of student phone numbers
SELECT AVG(LENGTH(PhoneNumber)) AS AvgPhoneNumberLength
FROM StudentContact;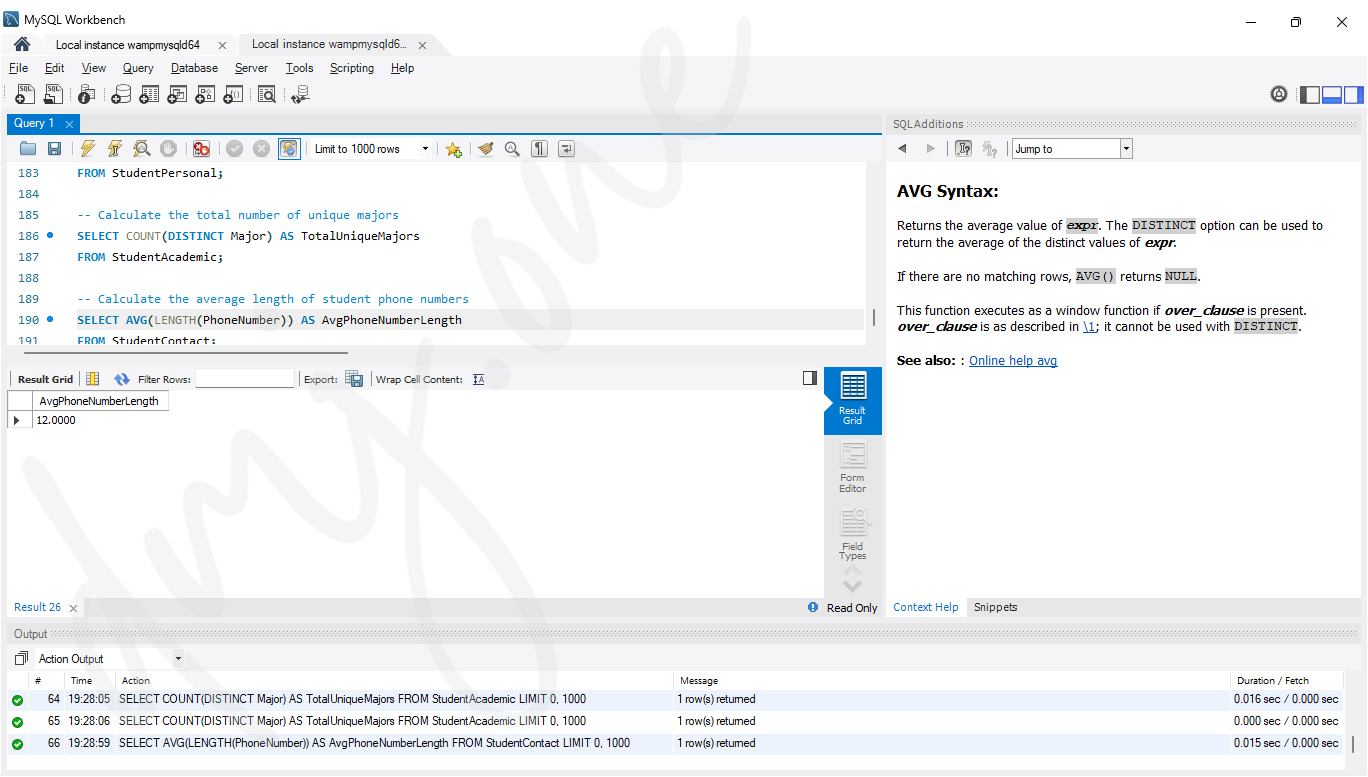
8.6 Aggregate Functions Explanation
The above aggregate functions perform the following calculations:
- COUNT: Counts the total number of students in the
StudentPersonaltable. - MAX: Finds the latest enrollment date from the
StudentAcademictable. - MIN: Finds the earliest date of birth from the
StudentPersonaltable. - SUM: Counts the total number of unique majors in the
StudentAcademictable. - AVG: Calculates the average length of phone numbers in the
StudentContacttable.
9. Using ORDER BY Clause
The ORDER BY clause is used to sort the result set of a query by one or more columns. By default, it sorts the results in ascending order, but it can also sort in descending order using the DESC keyword.
9.1 Ordering by Ascending Order
To sort results in ascending order, simply use the ORDER BY clause without the DESC keyword.
-- Retrieve students ordered by first name in ascending order
SELECT *
FROM StudentPersonal
ORDER BY FirstName ASC;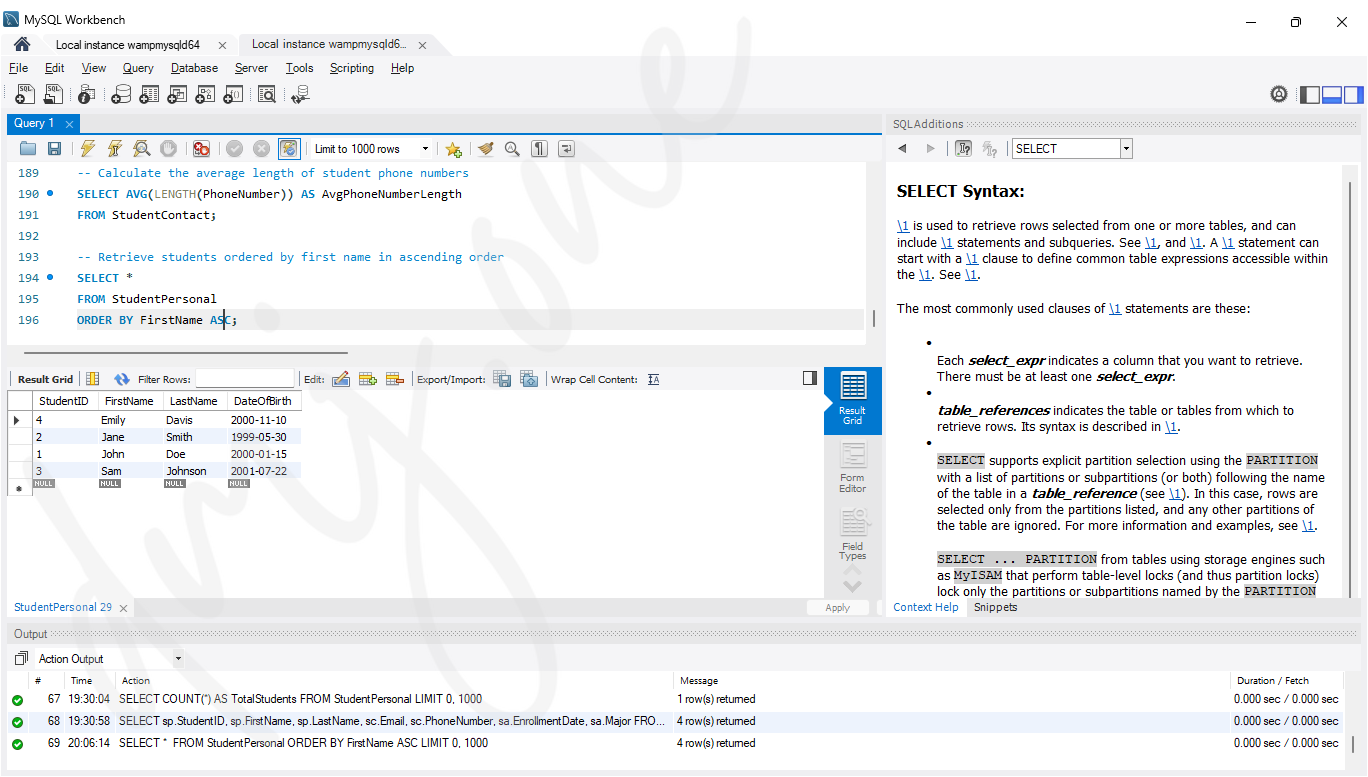
9.2 Ordering by Descending Order
To sort results in descending order, use the DESC keyword with the ORDER BY clause.
-- Retrieve students ordered by date of birth in descending order
SELECT *
FROM StudentPersonal
ORDER BY DateOfBirth DESC;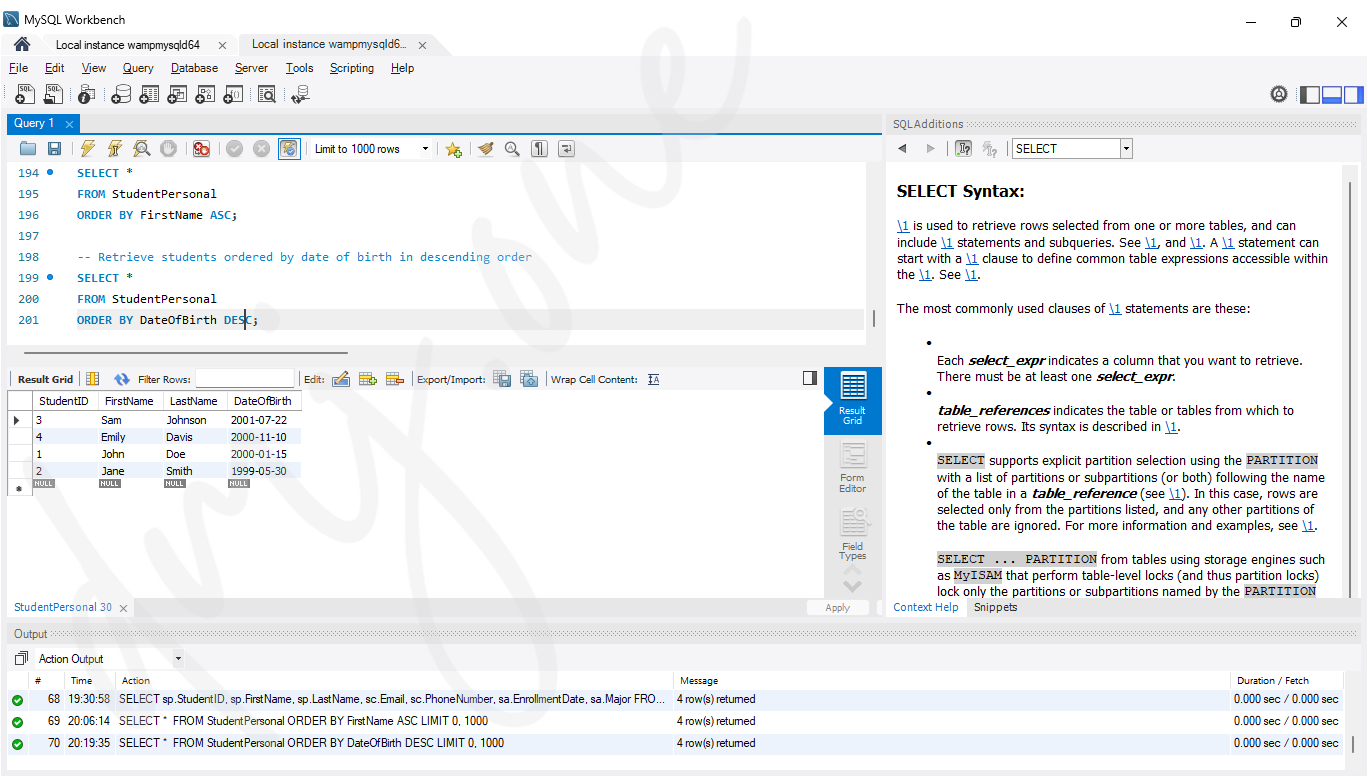
9.3 Ordering by Multiple Columns
To sort results by multiple columns, list the columns separated by commas. The sorting is applied in the order the columns are listed.
-- Retrieve students ordered by last name and then first name in ascending order
SELECT *
FROM StudentPersonal
ORDER BY LastName ASC, FirstName ASC;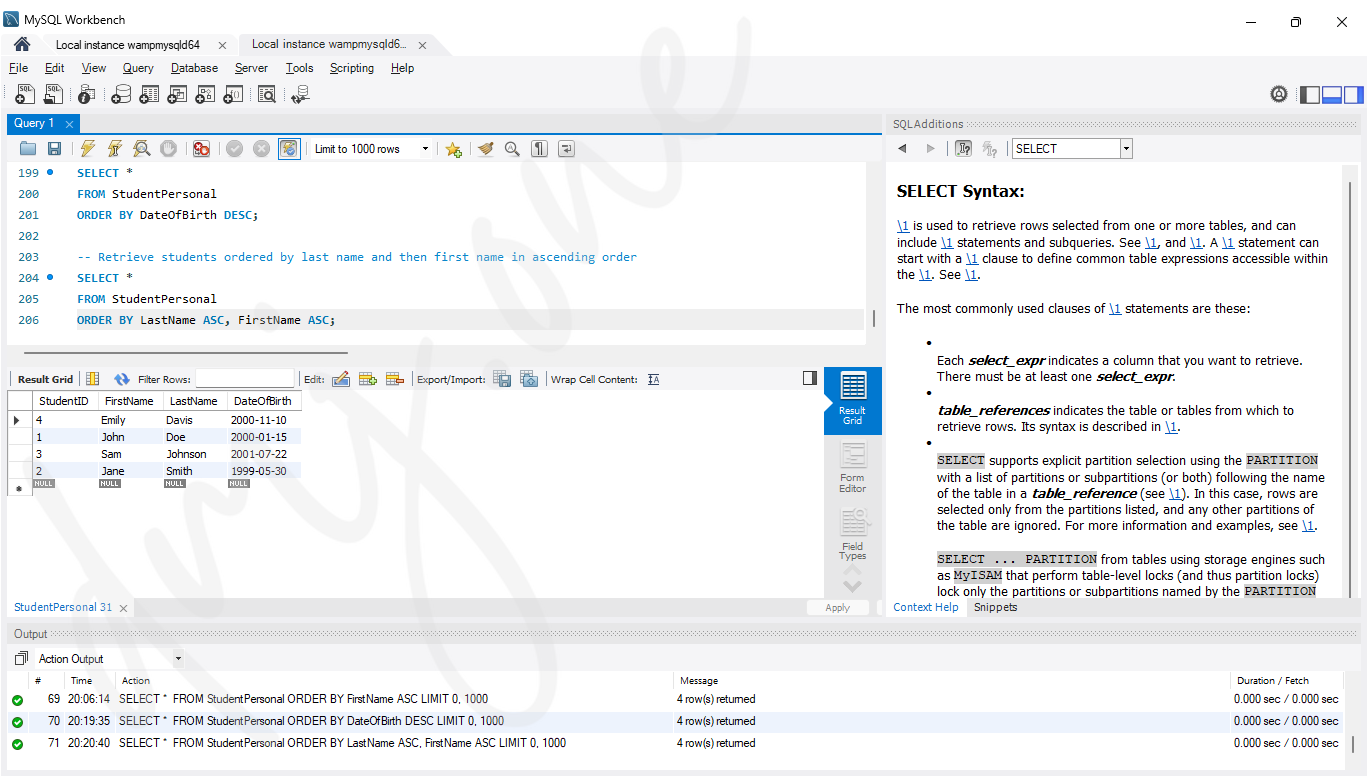
10. Using GROUP BY Clause
The GROUP BY clause is used to group rows that have the same values in specified columns into aggregate data. It is often used with aggregate functions like COUNT, SUM, AVG, etc.
10.1 Grouping by a Single Column
To group results by a single column, use the GROUP BY clause with the column name.
-- Count the number of students in each major
SELECT Major, COUNT(*) AS StudentCount
FROM StudentAcademic
GROUP BY Major;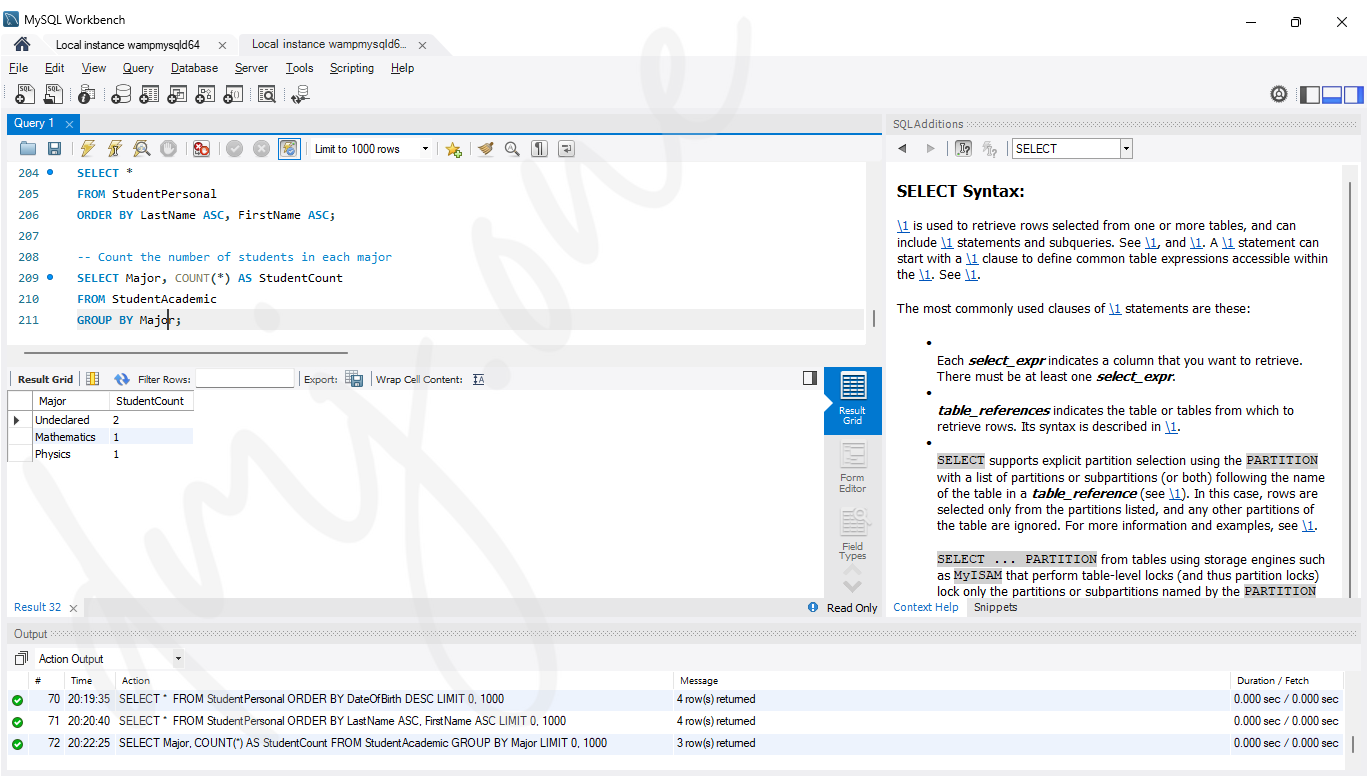
10.2 Grouping by Multiple Columns
To group results by multiple columns, list the columns separated by commas.
-- Count the number of students by major and enrollment date
SELECT Major, EnrollmentDate, COUNT(*) AS StudentCount
FROM StudentAcademic
GROUP BY Major, EnrollmentDate;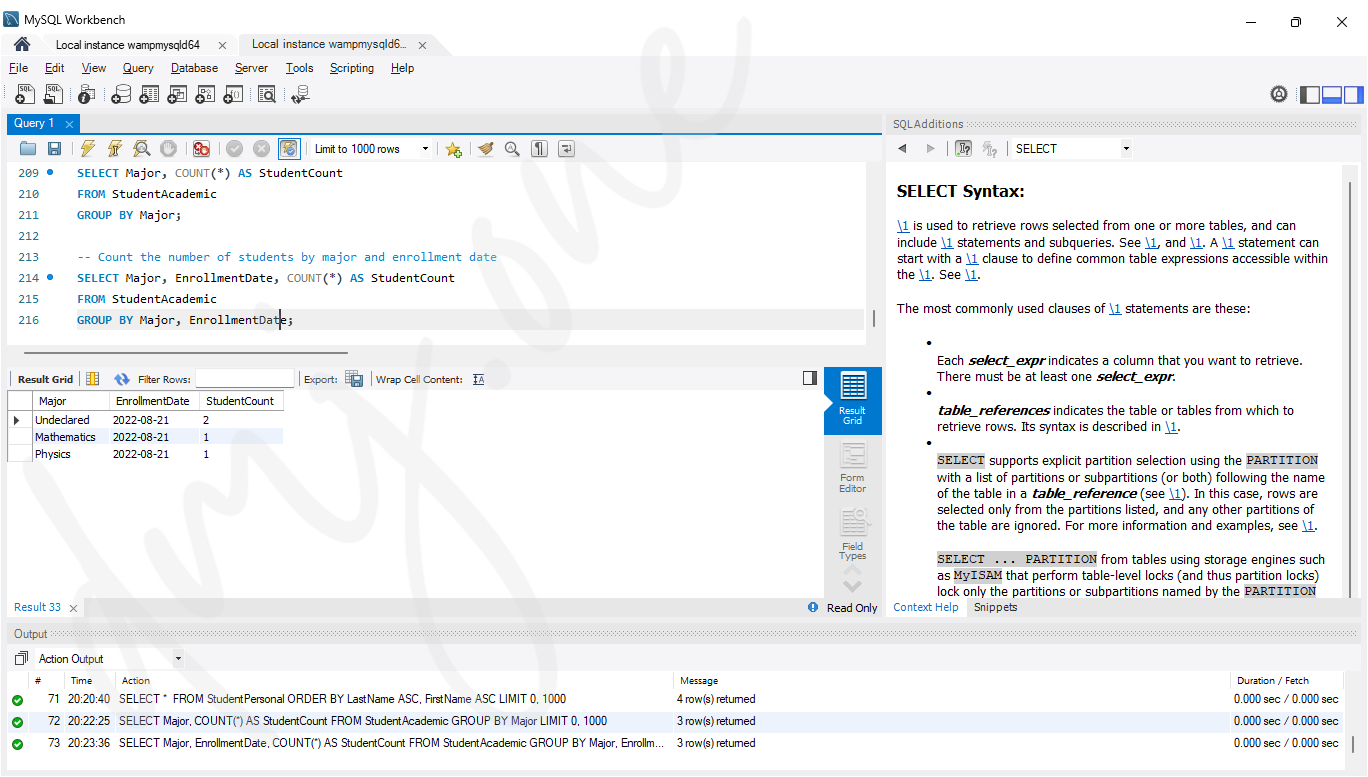
11. Using HAVING Clause
The HAVING clause is used to filter groups based on a condition. It is similar to the WHERE clause, but it is used with the GROUP BY clause to filter the groups.
11.1 Using HAVING with GROUP BY
To filter groups based on an aggregate condition, use the HAVING clause with the GROUP BY clause.
-- Retrieve majors with more than one student
SELECT Major, COUNT(*) AS StudentCount
FROM StudentAcademic
GROUP BY Major
HAVING COUNT(*) > 1;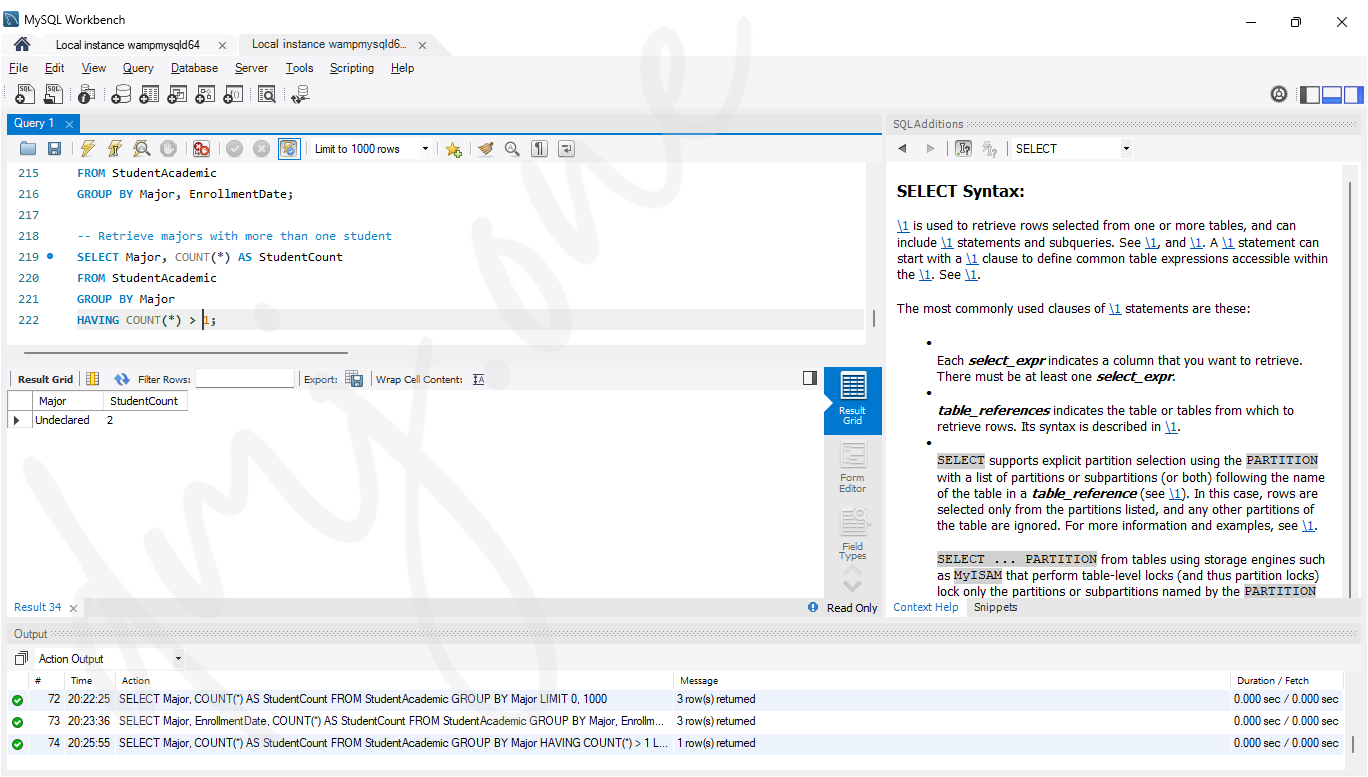
11.2 Clause Explanation
The above SQL statements demonstrate the use of:
- ORDER BY: Sorting the result set in ascending or descending order by one or more columns.
- GROUP BY: Grouping rows that have the same values in specified columns and performing aggregate functions on them.
- HAVING: Filtering the grouped rows based on a specified condition.
12. Performing Transactions
Transactions in SQL are used to ensure that a series of operations are executed as a single unit. Transactions maintain the integrity of the database by ensuring that either all operations succeed or none do. The key statements used in transactions are BEGIN TRANSACTION, COMMIT, and ROLLBACK.
12.1 Beginning a Transaction
To start a transaction, use the BEGIN TRANSACTION statement.
-- Start a new transaction
BEGIN TRANSACTION;
12.2 Committing a Transaction
The COMMIT statement is used to save all changes made during the transaction permanently.
-- Commit the transaction
COMMIT;
12.3 Rolling Back a Transaction
The ROLLBACK statement is used to undo all changes made during the transaction, reverting the database to its state before the transaction began.
-- Rollback the transaction
ROLLBACK;
12.4 Example Transaction
Here is an example of a transaction that updates a student's email and phone number. If both updates are successful, the transaction is committed; otherwise, it is rolled back.
-- Start a new transaction
BEGIN TRANSACTION;

-- Update student's email
UPDATE StudentContact
SET Email = '[email protected]'
WHERE StudentID = 1;

-- Update student's phone number
UPDATE StudentContact
SET PhoneNumber = '999-999-9999'
WHERE StudentID = 1;

-- Check if both updates were successful
IF @@ERROR = 0
BEGIN
    -- Commit the transaction
    COMMIT;
END
ELSE
BEGIN
    -- Rollback the transaction
    ROLLBACK;
END;
12.5 Transaction Explanation
The example transaction performs the following steps:
- BEGIN TRANSACTION: Starts a new transaction.
- Updates the email and phone number of the student with StudentID 1.
- Checks for any errors using
@@ERROR. - If no errors are found, COMMIT saves the changes.
- If errors are detected, ROLLBACK reverts all changes made during the transaction.
13. Further Reading
Beyond basic operations, there are several advanced topics and best practices that are crucial for working with databases efficiently and securely.
13.1 Indexes
Indexes are used to speed up the retrieval of data from a table by providing quick access to rows. Indexes can be created on one or more columns.
-- Create an index on the FirstName column
CREATE INDEX idx_firstname ON StudentPersonal (FirstName);
13.2 Views
Views are virtual tables that provide a way to simplify complex queries, encapsulate complex logic, and present a specific subset of data.
-- Create a view to display student details
CREATE VIEW StudentDetails AS
SELECT sp.StudentID, sp.FirstName, sp.LastName, sc.Email, sa.Major
FROM StudentPersonal sp
JOIN StudentContact sc ON sp.StudentID = sc.StudentID
JOIN StudentAcademic sa ON sp.StudentID = sa.StudentID;
13.3 Stored Procedures
Stored Procedures are precompiled collections of SQL statements and optional control-of-flow statements stored under a name and processed as a unit. They are used to encapsulate logic, improve performance, and enhance security.
-- Create a stored procedure to insert a new student
CREATE PROCEDURE InsertStudent
    @FirstName NVARCHAR(50),
    @LastName NVARCHAR(50),
    @DateOfBirth DATE,
    @Email NVARCHAR(100),
    @PhoneNumber NVARCHAR(15),
    @EnrollmentDate DATE,
    @Major NVARCHAR(50)
AS
BEGIN
    -- Insert into StudentPersonal
    INSERT INTO StudentPersonal (FirstName, LastName, DateOfBirth)
    VALUES (@FirstName, @LastName, @DateOfBirth);

    -- Get the new student's ID
    DECLARE @StudentID INT = SCOPE_IDENTITY();

    -- Insert into StudentContact
    INSERT INTO StudentContact (StudentID, Email, PhoneNumber)
    VALUES (@StudentID, @Email, @PhoneNumber);

    -- Insert into StudentAcademic
    INSERT INTO StudentAcademic (StudentID, EnrollmentDate, Major)
    VALUES (@StudentID, @EnrollmentDate, @Major);
END;
13.4 Triggers
Triggers are special types of stored procedures that automatically execute or fire when an event occurs in the database server. They can be used to enforce business rules, maintain audit trails, and synchronize tables.
-- Create a trigger to log changes to StudentContact
CREATE TRIGGER trg_LogStudentContactChanges
ON StudentContact
AFTER INSERT, UPDATE, DELETE
AS
BEGIN
    -- Log the changes to a separate table
    INSERT INTO StudentContactLog (ActionType, StudentID, ChangeDate)
    SELECT
        CASE
            WHEN EXISTS(SELECT * FROM inserted) AND EXISTS(SELECT * FROM deleted) THEN 'UPDATE'
            WHEN EXISTS(SELECT * FROM inserted) THEN 'INSERT'
            ELSE 'DELETE'
        END,
        COALESCE(INSERTED.StudentID, DELETED.StudentID),
        GETDATE()
    FROM
        inserted
    FULL OUTER JOIN
        deleted ON inserted.StudentID = deleted.StudentID;
END;
13.5 Security
Security is a crucial aspect of database management. It involves controlling access to data and ensuring only authorized users can perform certain actions. Use roles and permissions to manage security effectively.
-- Create a role and grant permissions
CREATE ROLE StudentManager;

-- Grant SELECT permission on StudentPersonal
GRANT SELECT ON StudentPersonal TO StudentManager;

-- Grant INSERT permission on StudentContact
GRANT INSERT ON StudentContact TO StudentManager;

-- Assign role to a user
EXEC sp_addrolemember 'StudentManager', 'username';
13.6 Backups
Backups are essential to prevent data loss. Regularly back up your database to ensure you can recover data in case of hardware failures, software issues, or other disasters.
-- Create a full database backup
BACKUP DATABASE StudentDB
TO DISK = 'C:\Backups\StudentDB_Backup.bak';
13.7 Performance Tuning
Performance Tuning involves optimizing database queries and schema to improve performance. Techniques include indexing, query optimization, and database normalization.
- Indexing: Create indexes on frequently queried columns.
- Query Optimization: Use efficient SQL queries, avoid unnecessary columns, and use proper join techniques.
- Normalization: Ensure your database is normalized to avoid redundancy and maintain data integrity.
14. Practical daily-life Concepts and Best Practices
Beyond basic and advanced database operations, several additional concepts and practices are crucial for Computer Science Engineering (CSE) students. These include understanding database design principles, using modern database technologies, and implementing best practices for security and performance.
14.1 Database Normalization
Normalization is a process to design database schema in a way that reduces redundancy and dependency. It involves dividing a database into two or more tables and defining relationships between them. Common normal forms include:
- 1NF (First Normal Form): Ensures that each column contains atomic (indivisible) values and each column contains values of a single type.
- 2NF (Second Normal Form): Achieves 1NF and ensures that all non-key attributes are fully functional dependent on the primary key.
- 3NF (Third Normal Form): Achieves 2NF and ensures that all non-key attributes are not transitively dependent on the primary key.
14.2 Entity-Relationship (ER) Modeling
ER Modeling is a conceptual database design method that graphically represents data objects, relationships between them, and constraints. Key components include:
- Entities: Objects or concepts that can have data stored about them (e.g., Student, Course).
- Attributes: Properties or details of an entity (e.g., StudentName, CourseID).
- Relationships: Associations between entities (e.g., Students enroll in Courses).
ER diagrams are used to visualize database structure and design before implementation.
14.3 NoSQL Databases
NoSQL Databases are non-relational databases designed for specific data models and have flexible schemas for building modern applications. Types include:
- Document Stores (e.g., MongoDB): Store data as JSON-like documents.
- Key-Value Stores (e.g., Redis): Store data as key-value pairs.
- Column-Family Stores (e.g., Apache Cassandra): Store data in columns and rows.
- Graph Databases (e.g., Neo4j): Store data in graph structures with nodes and edges.
14.4 SQL Injection
SQL Injection is a code injection technique that exploits vulnerabilities in an application's software by injecting malicious SQL statements into an entry field for execution. To prevent SQL injection, use:
- Prepared Statements: Use parameterized queries to ensure SQL code is separated from data.
- Input Validation: Validate and sanitize user inputs to prevent malicious data.
- Least Privilege Principle: Limit database user permissions to only what is necessary.
-- Example of a prepared statement
PREPARE stmt FROM 'SELECT * FROM Students WHERE StudentID = ?';
SET @student_id = 1;
EXECUTE stmt USING @student_id;
DEALLOCATE PREPARE stmt;
14.5 Data Backup and Recovery
Data Backup and Recovery are critical for ensuring data availability and integrity in case of system failures, accidental deletions, or disasters. Best practices include:
- Regular Backups: Schedule automated regular backups of the database.
- Offsite Storage: Store backups in multiple locations, including offsite or cloud storage.
- Recovery Testing: Regularly test backup and recovery procedures to ensure they work as expected.
14.6 Big Data
Big Data refers to large volumes of structured and unstructured data that require specialized tools and techniques to process and analyze. Key technologies include:
- Hadoop: An open-source framework for distributed storage and processing of large data sets.
- Apache Spark: A fast and general-purpose cluster computing system for big data processing.
- Data Lakes: Centralized repositories that allow storage of structured and unstructured data at any scale.
14.7 Data Analytics and Visualization
Data Analytics involves examining datasets to draw conclusions about the information they contain. Tools for data analysis and visualization include:
- SQL: For querying and analyzing structured data.
- Python (with libraries like Pandas, NumPy): For data manipulation and analysis.
- Visualization Tools (e.g., Tableau, Power BI): For creating visual representations of data to uncover patterns and insights.
14.8 Cloud Databases
Cloud Databases are databases that run on cloud computing platforms and offer scalability, high availability, and managed services. Popular cloud database services include:
- Amazon RDS: Managed relational database service by AWS.
- Google Cloud SQL: Fully managed relational database service by Google Cloud.
- Microsoft Azure SQL Database: Managed relational database service by Microsoft Azure.
14.9 API Integration with Databases
API Integration involves connecting applications with databases through Application Programming Interfaces (APIs). APIs allow applications to communicate and interact with databases over the web. Practical uses include:
- RESTful APIs: Use HTTP methods (GET, POST, PUT, DELETE) to perform CRUD operations on databases.
- GraphQL: A query language for APIs that allows clients to request specific data, improving efficiency and flexibility.
# Example of using a REST API to interact with a database
import requests

# URL of the REST API
url = 'https://dmj.one/api/students'

# GET request to retrieve data
response = requests.get(url)
students = response.json()

# POST request to add a new student
new_student = {'FirstName': 'John', 'LastName': 'Doe', 'Email': '[email protected]'}
response = requests.post(url, json=new_student)
14.10 Database Automation
Database Automation involves using scripts and tools to automate routine database tasks, such as backups, updates, and monitoring. Benefits include improved efficiency, reduced errors, and better resource management.
- SQL Scripts: Automate repetitive tasks using SQL scripts.
- Task Schedulers: Use tools like cron jobs (Linux) or Task Scheduler (Windows) to schedule database tasks.
- Database Management Tools: Use tools like Ansible, Puppet, or Chef to automate database deployment and management.
-- Example of a scheduled backup script
BACKUP DATABASE StudentDB
TO DISK = 'C:\Backups\StudentDB_Backup.bak'
WITH FORMAT, MEDIANAME = 'SQLServerBackups',
NAME = 'Full Backup of StudentDB';
14.11 Data Privacy and Compliance
Data Privacy and Compliance are essential for protecting sensitive information and ensuring adherence to regulations. Best practices include:
- Data Encryption: Encrypt data at rest and in transit to protect against unauthorized access.
- Access Controls: Implement role-based access control (RBAC) to restrict data access based on user roles.
- Compliance Standards: Adhere to standards like GDPR, HIPAA, and PCI-DSS to ensure data protection and privacy.
-- Example of creating a user with limited access
CREATE USER limited_user WITH PASSWORD = 'SecurePassword123';
GRANT SELECT ON StudentPersonal TO limited_user;
A note for aspiring CSE professionals
Conclusion
In the ever-evolving field of Computer Science Engineering, understanding and mastering database concepts and practices is crucial for building robust, efficient, and secure applications. From basic CRUD operations to advanced topics like normalization, transactions, and API integration, these foundational skills are essential for any aspiring CSE professional. Emphasizing best practices in security, automation, and compliance ensures that your applications are not only functional but also resilient and trustworthy. By continually learning and adapting to new technologies and methodologies, you will be well-prepared to tackle the challenges and opportunities in the world of database management.
References
Laudon, K., & Laudon, J. (2021). Management information systems: Managing the digital firm. Harlow: Pearson Education, Limited.
SWEIGART, A. (2024). Automate the boring stuff with python. S.l.: O’REILLY MEDIA.
Stallings, W. (2017). Cryptography and network security principles and practices. Boston, Mass: Pearson.
CS50's introduction to programming with python. (n.d.). Retrieved from https://cs50.harvard.edu/python/2022/
CS50's introduction to databases with SQL. (n.d.). Retrieved from https://cs50.harvard.edu/sql/2024/
CS50's introduction to cybersecurity. (n.d.). Retrieved from https://cs50.harvard.edu/cybersecurity/2023/